Friction Loss

Hand Method for Friction Loss

Screen-Shot-2014-06-30-at-3.31.27-PM.png

In my last article, I talked about memorization as a method for figuring friction loss on the fire scene. In this article we will talk about another fire ground method… the hand method. This method requires a little bit of arithmetic that can become confusing in stressful situations. However, it still is a simple method that can be easily mastered. There are a lot of extremely good pump operators out there that prefer this method. It is similar to the memorization method, in the sense that we will be talking about 1 ¾ diameter hose and all friction loss is figured in 100 feet hose lengths. One major difference between the two is the fact that the memorization method is exact and the hand method is not. It will be plus or minus a couple of psi every time you figure it, but differences will be minuscule and you will probably never find them on the pump panel. Keep in mind this is still just friction loss. You will still have to add your nozzle pressure in order to get your pump discharge pressure. We have provided a training video below but if you continue reading we will go into detail about how to use the Hand Method for calculating friction loss.

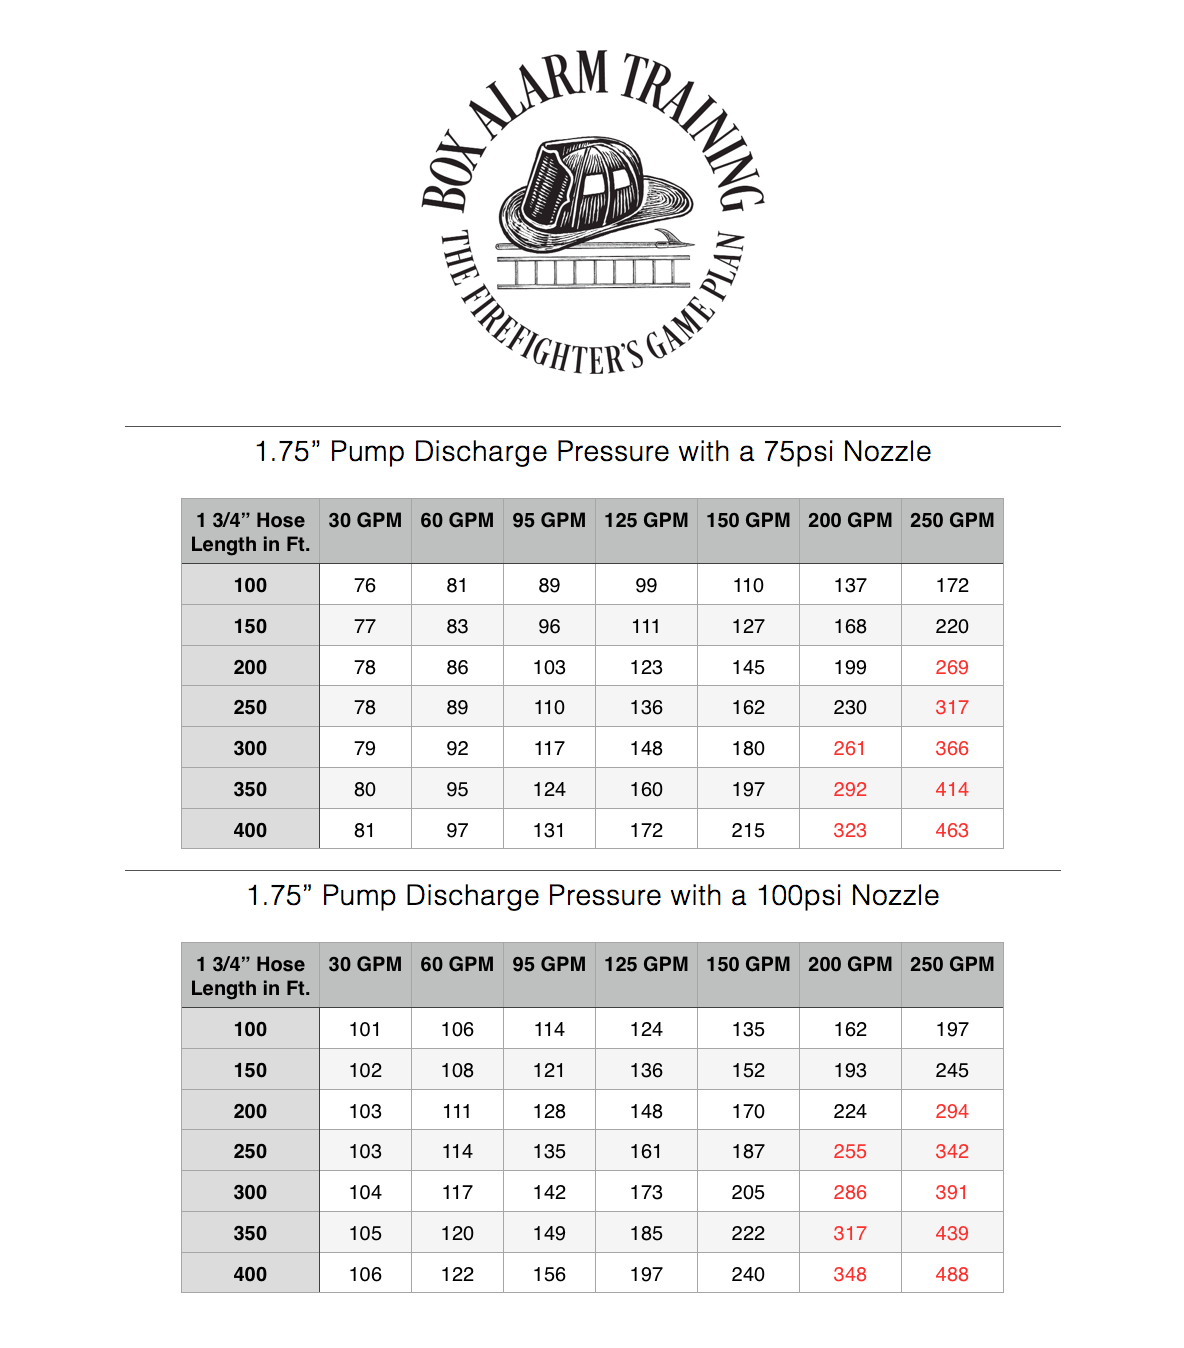
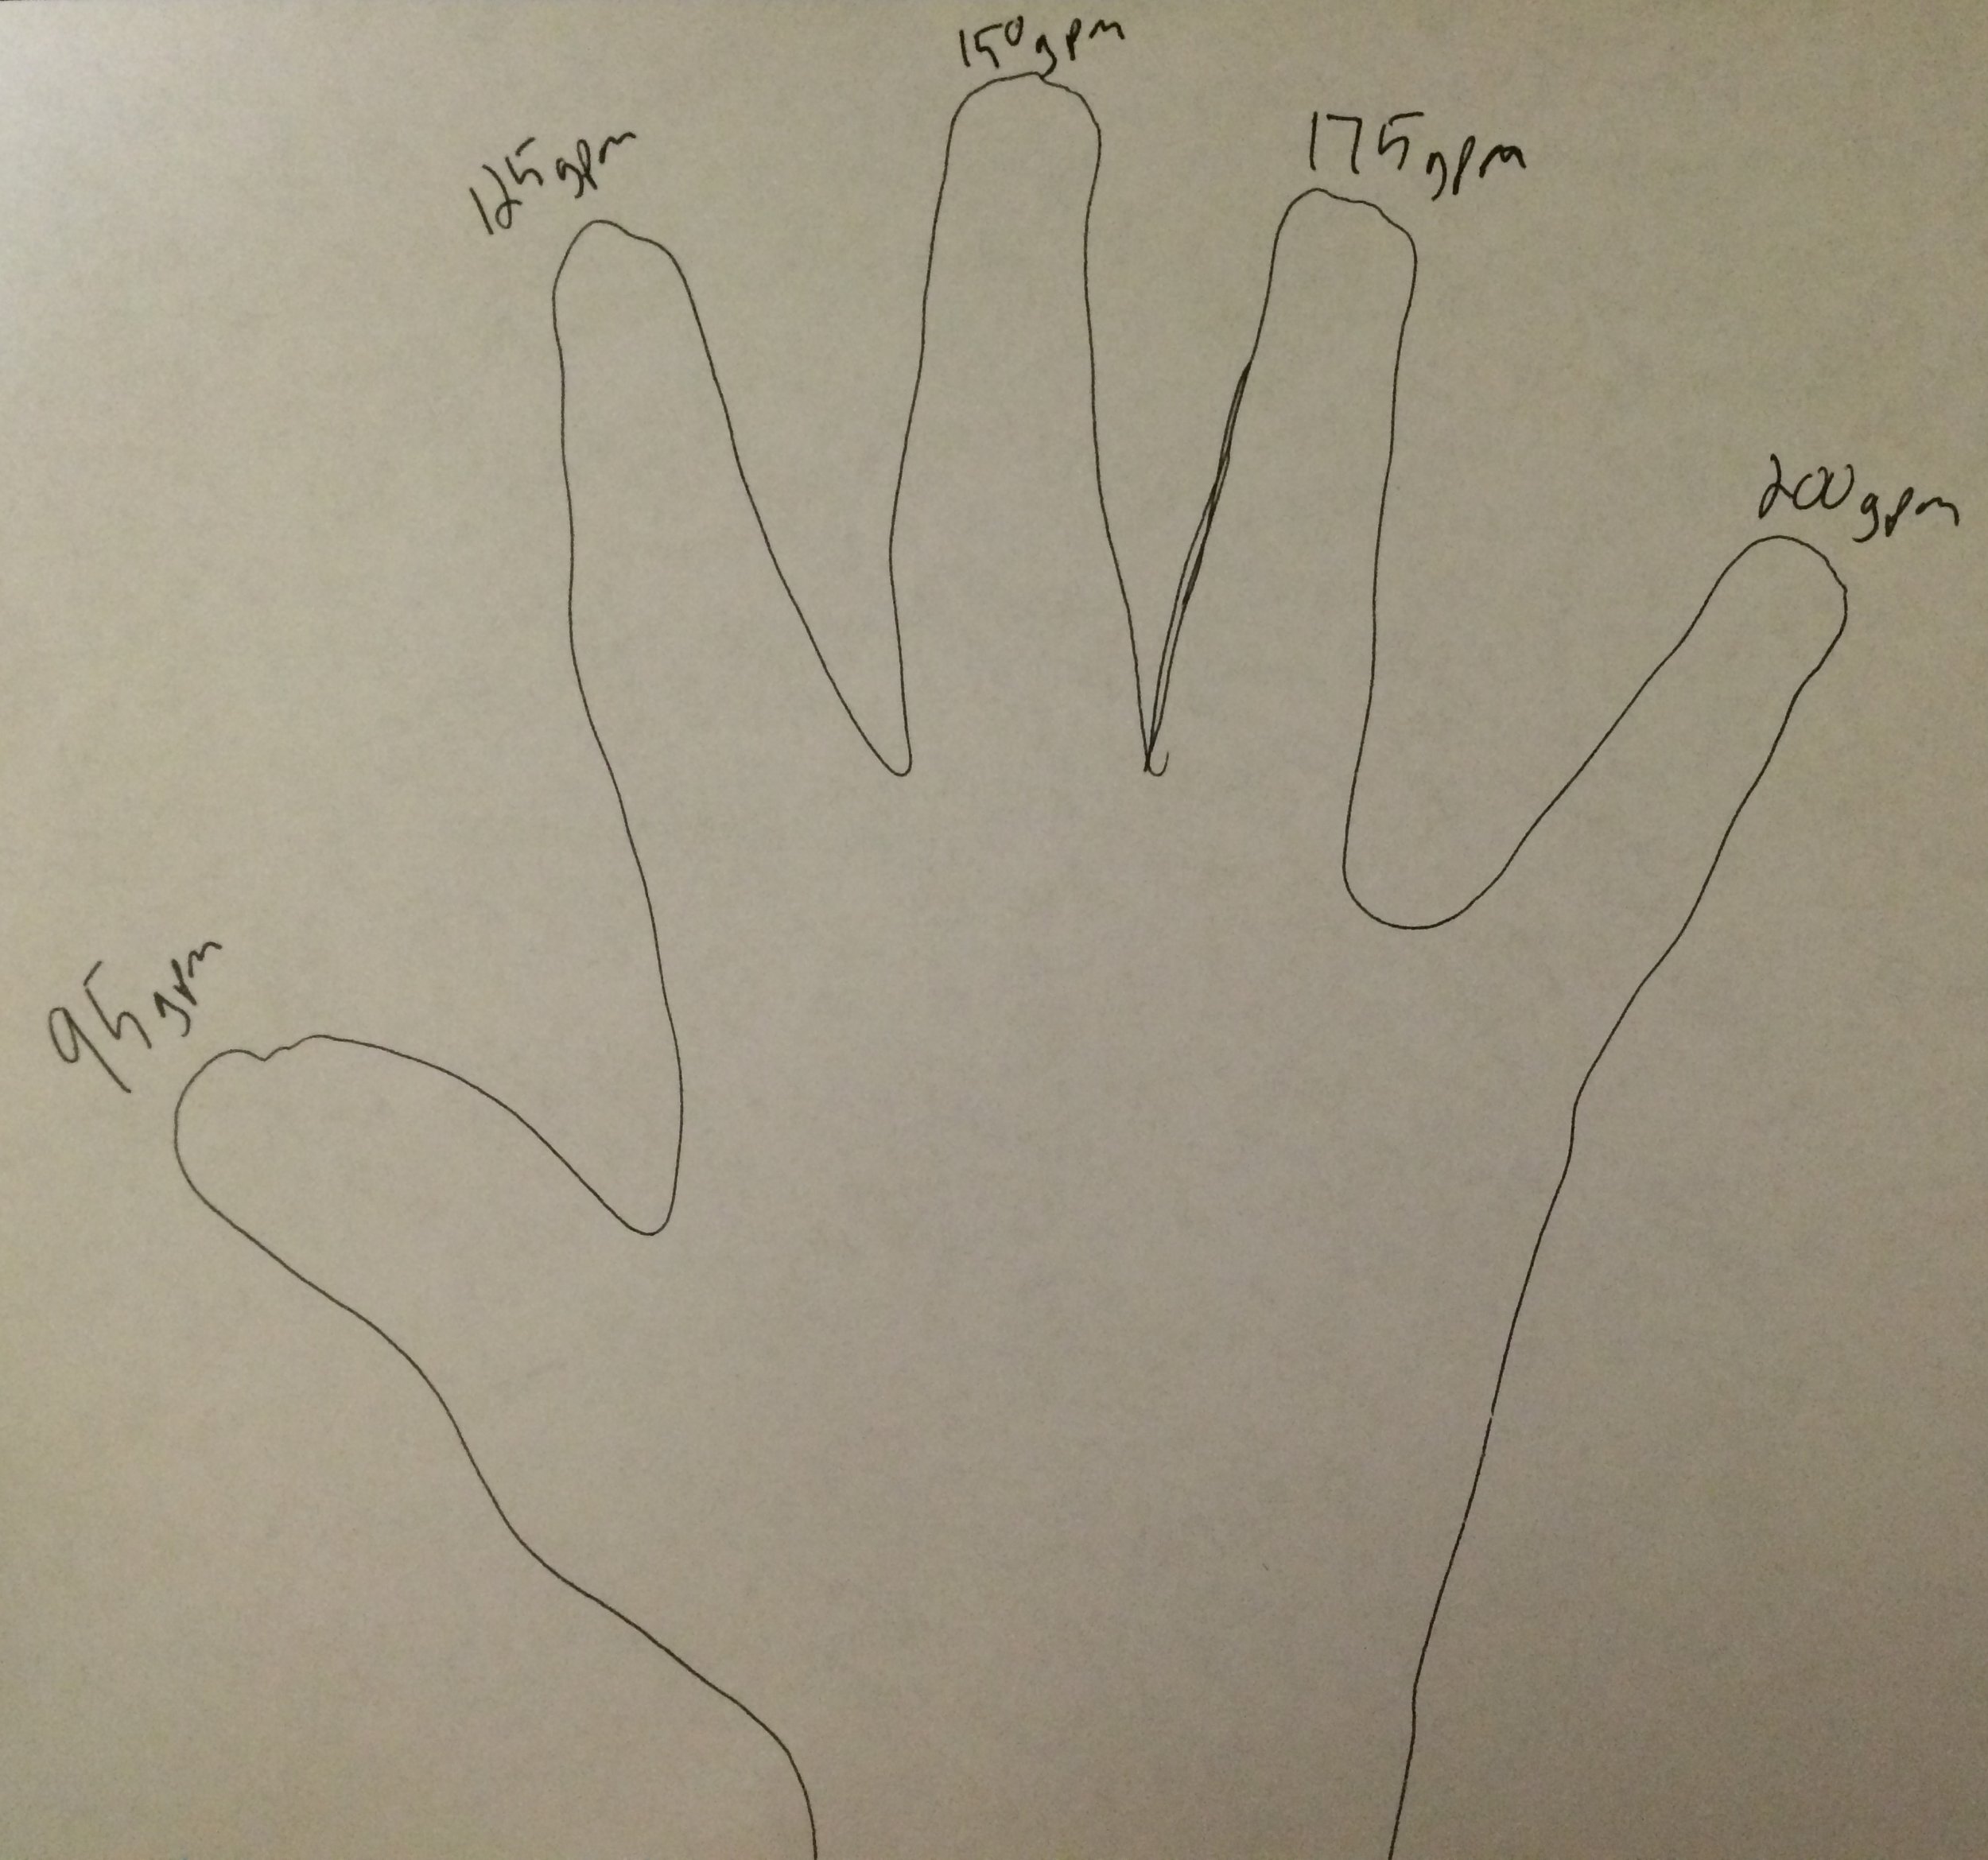
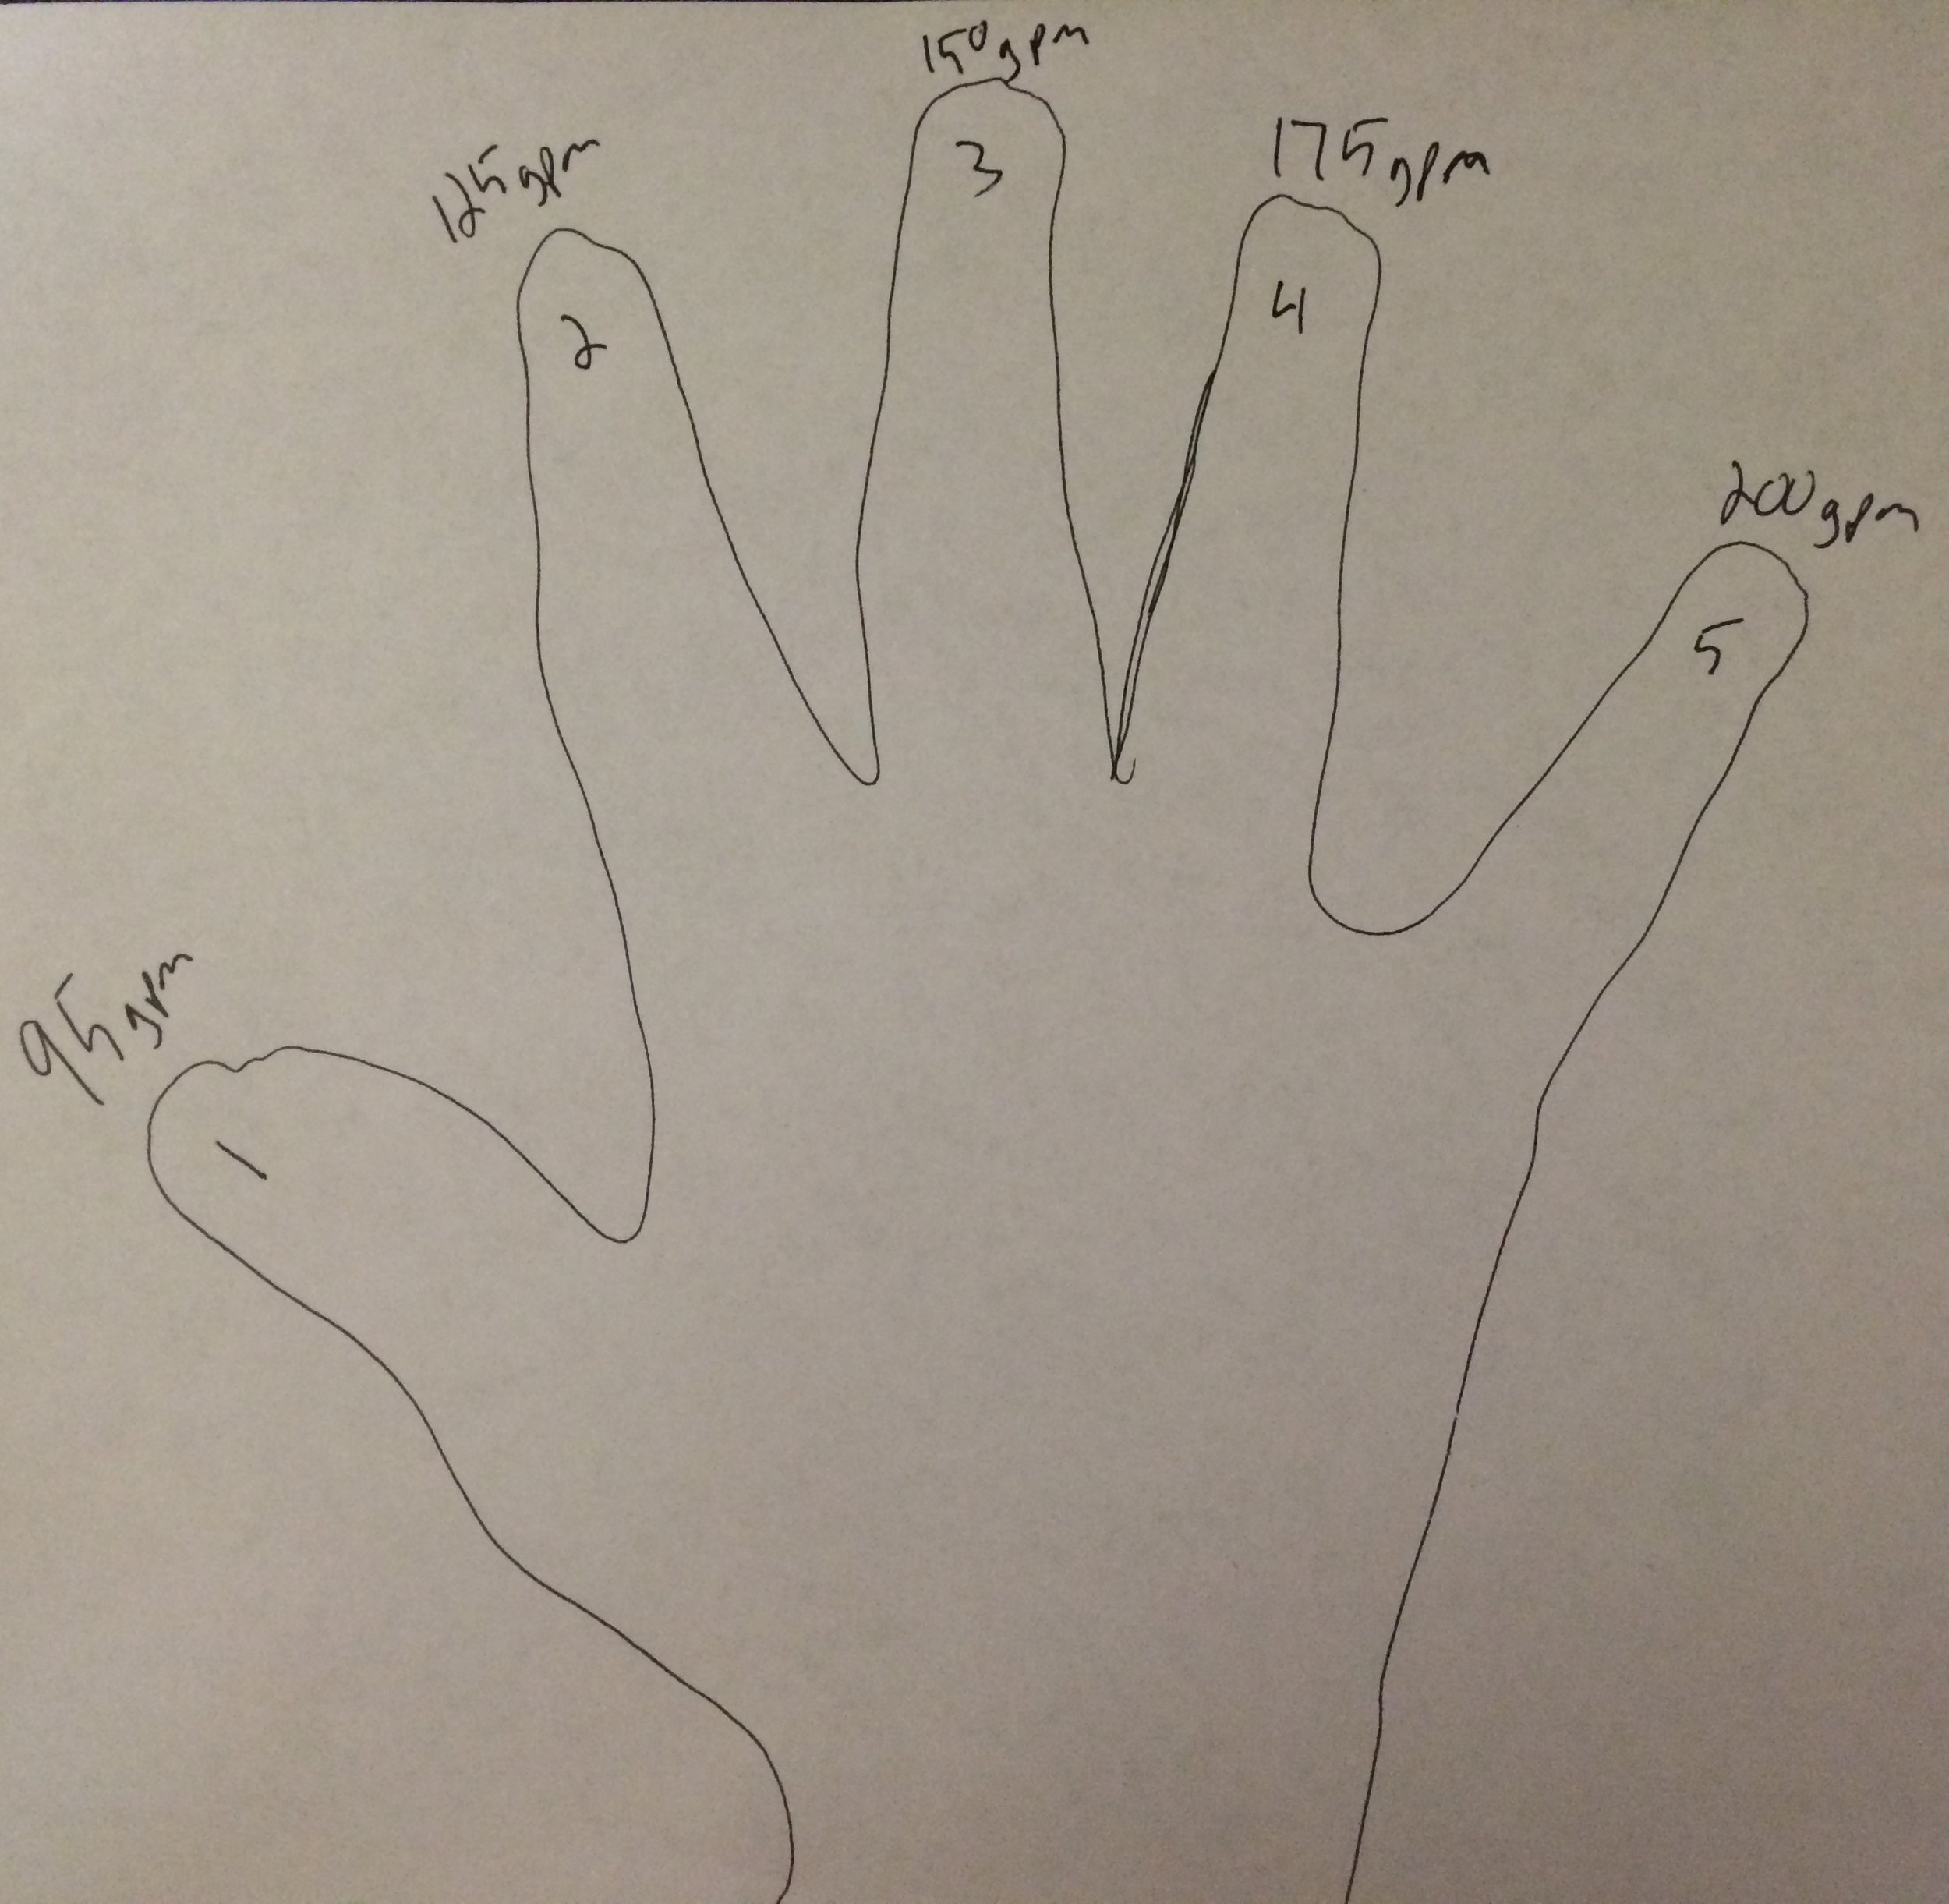
So, lets get started. Here again we will be talking about fog nozzles. Remember, most fog nozzles have four gallons per minute settings… 95gpm, 125gpm, 150gpm, and 200gpm. Now, hold up your left or right hand and spread your fingers. I’m right handed so I will be using my left hand for my descriptions. Imagine your fingers are the gallons per minute settings on the nozzle. Starting with your thumb. The thumb will be 95, index finger 125, middle finger 150, ring finger 175, and pinky finger 200. You can also use these GPM settings for rough estimates on smoothbore nozzle flows if you know them.

These are simple pictures, but they are the simplest way to explain this method.

STEP 1

The first step is to imagine your GPM settings across your fingertips. This would start with the thumb (95 or 100 GPM) then continue across the remaining fingers. (125, 150, 175, 200 GPM).


IMG_0234STEP 2

The next step is to number your fingers 1-5. You start by placing the #1 on your thumb followed by 2, 3, 4, and 5 on the remaining fingers.


IMG_0235STEP 3

To finish setting up your hand method you will imagine the number 12 in the palm of your hand.

In order to figure the friction loss, all you have to do is multiply 12 by whatever number or finger you need to use. We will use the same scenarios as we did in the last article.


Lets say you are driving one day and you pull up to a car fire. Your officer and firefighter pull the 100ft jump line and you know you need to be flowing 95 GPM. So, you look at your hand and you notice 95 GPM is at the number 1 position. Multiply 1 x 12.

1 x12 = 12psi

 That equals 12. Twelve is your friction loss. If you have a 100psi nozzle just add 100psi. 12psi friction loss plus 100psi nozzle pressure equals 112 pump discharge pressure.

12psi + 100psi = 112psi

You are probably thinking that this isn’t right because it doesn’t equal exactly 114 like the other method. And you are right, it doesn’t. However, I do not know a firefighter in America that can feel a 2psi difference on the end of the nozzle. Its not exact but it will work efficiently.

Next scenario, you are at a structure fire that requires a 200ft line flowing 200gpm.   The 200gpm setting is at the number 5 position on your hand, just multiply 5 x 12. It equals 60.

5 x 12 = 60psi

That is 60psi friction loss per 100ft. We have a 200ft line so 60 plus 60 is 120psi total friction loss. Then add your nozzle pressure, 120 plus 100 equals 220psi.

60psi + 60psi + 100psi = 220psi

That is your pump discharge pressure. The exact pump discharge pressure for this scenario would be 224. Here again, I do not know any firefighter that can tell a 4psi difference on the nozzle. If you are using 75psi low-pressure nozzles, it works the same way; just add 75 instead of 100. In terms of friction loss and pump discharge pressure, there are several ways to figure it. On the scene, there are multiple ways to determine friction loss and only one wrong way; that is not getting a proper amount of water to your firefighters. Without it, they can’t put the fire out and could be put in some serious situations because of it. You, as a pump operator, have to figure out how you want to do it. It may be the hand method, memorization, or something else. It doesn’t matter as long as you get the right amount of water to the guys on the nozzle.   I hope one of these methods will work for you and next time we will be discussing the Subtract 10 method for calculating friction loss in a 2.5" hose.

FOR A DOWNLOADABLE PDF OF THIS ARTICLE CLICK HERE.

Friction Loss for Beginners

IMG_1840.jpg

Jackson, MS Engine 6Friction loss is something that is stressed about and is made out to be very difficult for new pump operators.  In reality it isn’t.  This is how the definition is read: Friction is the force resisting the relative motion of solid surfaces, fluid layers, and material elements sliding against each other (Friction, 2013).  Friction Loss is the pressure loss due to the friction.   In this case, the friction is water sliding against the interior of the fire hose. To overcome this, the pump operator must throttle up to ensure that the firefighter, on the nozzle, will have the appropriate amount of water to suppress the fire.   Friction loss can be calculated using mathematical equations which is the Theoretical Method.  You can also calculate friction loss using a series of easy to use methods that do not require a lot of math, these are called Fire-Ground Methods.  For the purpose of this article we will focus on the fire-ground methods.  I feel there is not enough emphasis put on fire-ground methods.  All too often when a new pump operator is being taught friction loss the instructors jump straight to the equations because they are the hardest to grasp.  No offense to the great pump operations instructors out there, but I haven’t seen too many calculators on the fire scene lately.  How can a firefighter figure this stuff out on the scene?  Theoretical calculations are generally used for pre-planning, spec'ing apparatus and calculating problems ahead of time; for instance making pump charts. You do not use theoretical calculations on fire scenes. There are multiple fire-ground methods for 1-¾ line, but I will talk about the one that works best for me… memorization.  Yes, it sounds hard but its not.   Its simple… just memorize the friction loss for the gallonage setting(s) on the nozzle.  Most 100psi adjustable fog nozzles have four settings 95gpm, 125gpm, 150gpm, and 200gpm.  So, all you have to remember is 14, 24, 35, and 62.  These are the exact amounts of friction loss per 100 feet based on the gallonage above.  There is 14psi friction loss per 100 feet when you are flowing 95 gallons per minute.  If you have a 100-foot line your friction loss is 14, if you have a 200-foot line your friction loss is 28.  It works the same way for the other gallonage settings.  For example, if you are flowing 150gpm on a 100-foot line your friction loss is 35, if you are using a 200-foot line you friction loss is 70.  Keep in mind this is just the friction loss; it is not the pressure you pump at the engine.  In order to figure this, you have to take into account nozzle pressure.

Box Alarm Training- Pump Discharge Pressure ChartMost fog nozzles require a pressure of 100psi or 75psi for it to function properly, this is called the Nozzle Pressure.  So, all you have to do is add 100psi or 75psi (Depending on your nozzle) to whatever your friction loss is and that will be your required Pump Discharge Pressure.  So, lets say you are driving one day and you pull up on a car fire that only requires a 100-foot line.  Your department’s SOPs require you to flow 95gpm while fighting this fire.  This means you have to figure the friction loss, which is 14, and then add it to the nozzle pressure, which is 100.

14 (Friction Loss)+ 100 (Nozzle Pressure) =114psi (Pump Discharge Pressure)

So, 114psi would be your pump discharge pressure.  It works the same way with the 200gpm setting.  If you are at a structure fire and you need to flow 200gpm out of a 200-foot line; first, figure the friction loss, which is 62 per 100.  62 for the first hundred plus 62 for the second hundred equals 124.  After this is figured all you need to do is add the nozzle pressure, in this case it is 100.

124 (Friction Loss) + 100 (Nozzle Pressure) = 224psi (Pump Discharge Pressure)

So, 224psi is your required pump discharge pressure.  This method works the same way on low-pressure fog nozzles.   They usually have a nozzle pressure of 75psi.  So, instead of adding 100psi just add 75psi.  In no way, shape, or form do I claim to be a great pump operator or even a good one for that matter.  I have just figured out what works for me and I can do it efficiently.  You may want to try the hand method… It requires too much on scene math for me.  However, in my next article I will explain it. Until then just click on this: The Pump Discharge Pressure Chart.  You can make your own pump charts for your engine which will tell the pump operator what to pump for each line on your engine.  You just find the gallonage and the length of hose you have, then the chart tells you what pressure to pump the truck.

You can also download a printable PDF version of this article by clicking here.

To read about our contributors including Wes Anderson click here.

Friction. In (2013). Wikipedia. Wikimedia. Retrieved from http://en.wikipedia.org/wiki/Friction