
Check out this video from the Mississippi State Fire Academy. You will get an aerial tour of the campus and you will also see several clips from the various burn sites on the campus. The Mississippi State Fire Academy is one of the largest firefighter training academies in the United States. Firefighters from all over the United States travel to the campus each year to participate in one of the many courses offered. Portions of this video were filmed with the DJI Phantom 2 Vision +. http://youtu.be/ALU5PB7EnIs
Forcible Entry - Shaving Bolts vs. Plunge Cutting

The guys at Irons and Ladders have put together a nice forcible entry video about the advantages and disadvantages of shaving bolt heads and plunge cutting. Identifying those bolt heads on the exterior of a door immediately let you know of the potential for alternative locking mechanisms. Identifying these features can make a dramatic difference in your time to force entry. Check out their video below. http://youtu.be/mmIQ5haWU3Q
Amazing Rescue Footage from Peoria

Many of you have seen videos from Peoria Fire Training before. In the past they have produced several very good training videos. I still continually hear and read all the negative comments regarding social media, helmet cameras and footage of fire scenes. I know there can be many negative things happen from using this footage but the benefits are incredible if used correctly. This is one of the few videos I have seen that actually allows us to see all of the working components involved in this rescue. If you are an instructor or company officer this video provides you with an incredible resource to use for training and preparing for these situations. https://www.youtube.com/watch?v=M8V4H59lQYg
Pump Operator Training - Video Series Summary

Over the last couple months we have been releasing a 5 part video series for Pump Operators. We hope these training videos will help you prepare for classes, tests and even more importantly the real world. This is the final summarizing video of the series. Below you will see all of the previous videos and a link to the Pump Operator Training Packet. We encourage you to print out the packet and train with your own crews. Pump Operations are an integral part of our operations that are often overlooked or taken for granted. If you have any questions or suggestions feel free to comment below and we will do our best to help you out. https://www.youtube.com/watch?v=fXg5Bnqo9Q0
If you have not seen the previous videos in this training series you can click on the images below to take you to the previous articles. You can also CLICK HERE to download the Pump Operator Training Packet.

You can also find more training videos on our YouTube channel by CLICKING HERE.
Pump Operator Training - Part 4

This is the fourth video of our five part pump operator training series. In this video we focus on calculating elevation gain and loss and also appliance pressure losses. We have provided you with a Pump Operator Training Packet to follow along if you need a list of the formulas and abbreviations. You can view the video below and if you missed the previous videos we strongly suggest watching those to understand the concepts previously discussed. The links to the previous videos will be provided below. https://www.youtube.com/watch?v=l780NY875zs
You can click on the images below to take you to our previous pump operator training videos:
Pump Operator Training - Part 3

This is the third video of our five part pump operator training series. In this video we focus on calculating Friction Loss. Often times firefighters underestimate the importance of making these calculations. If we do not calculate the correct pressure loss due to friction and then deliver the appropriate pump discharge pressure we could be placing our fellow firefighters in dangerous situations. Take a look at the video below and use our Pump Operator Training Packet to follow along. https://www.youtube.com/watch?v=F-wqKnUalEI
You can click on the images below to take you to our previous Pump Operator Training Videos:
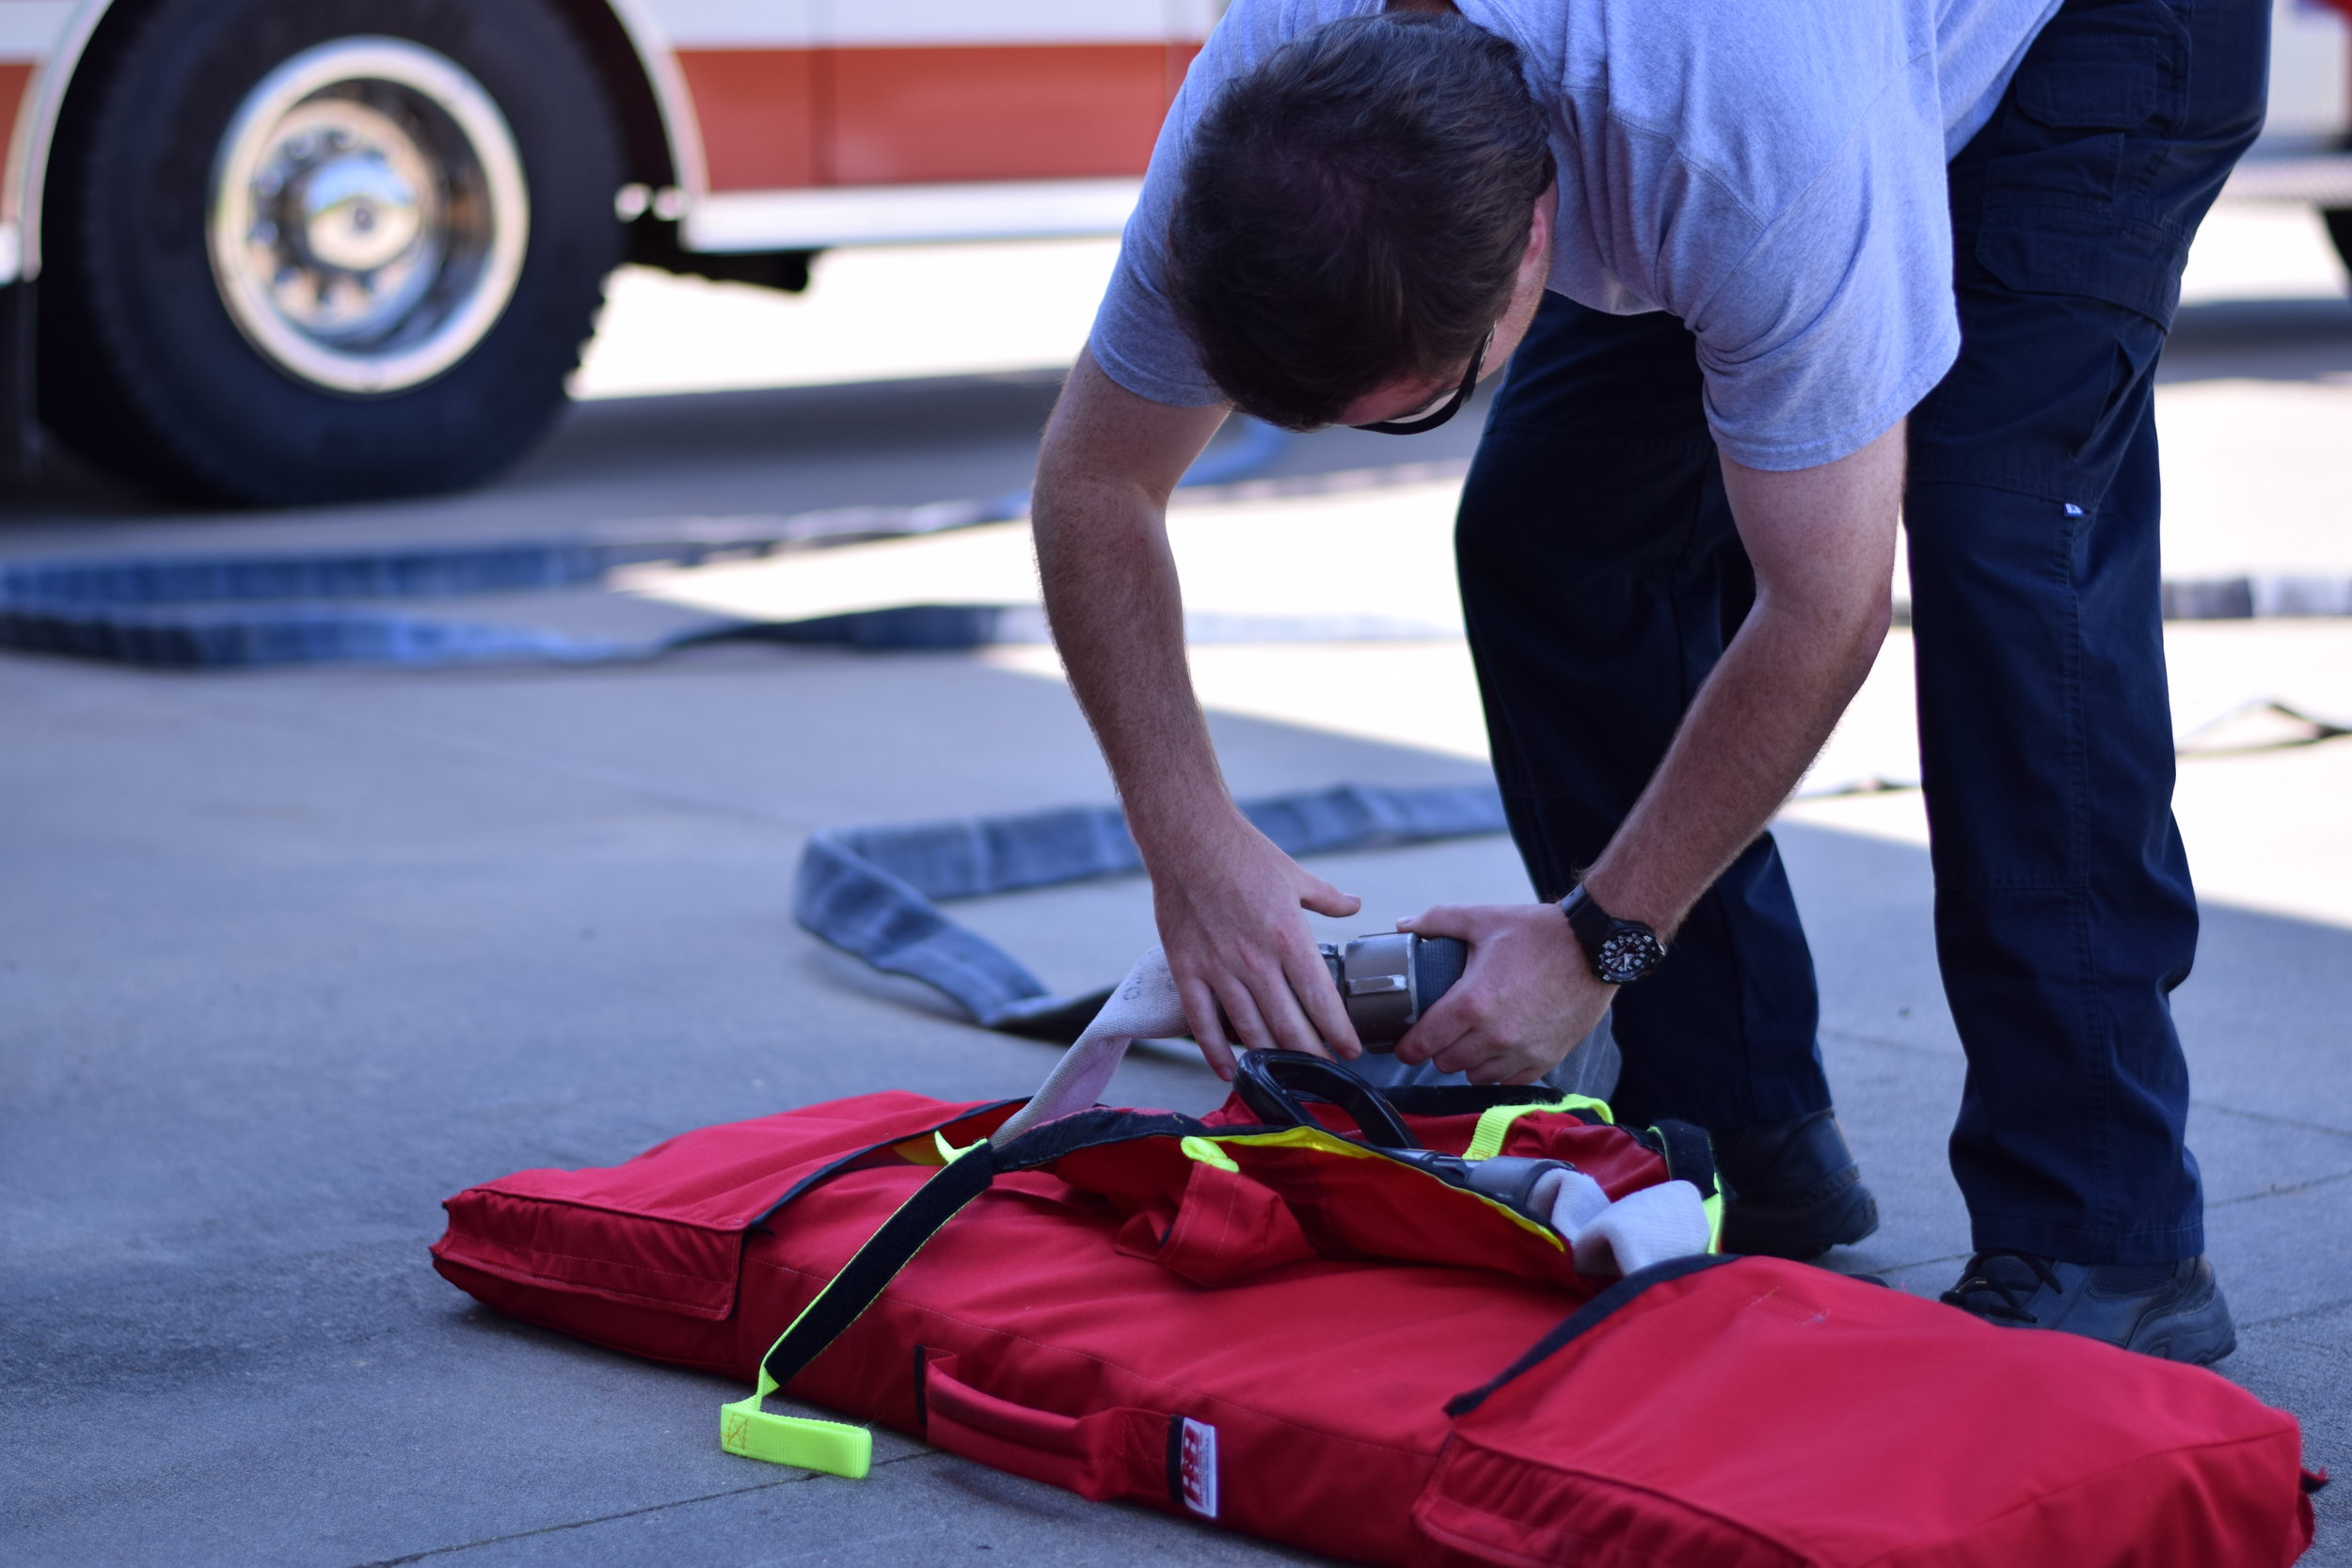
New High-Rise Pack Innovation - QuickLay Fire Attack

https://www.youtube.com/watch?v=km9ETzhw7i0 QuickLay Fire Attack has introduced their brand new Attack Pack and Lay Pack for the American Fire Service. I had an awesome opportunity to meet and talk with Sebastian Jacobs, the Managing Director of QLFA, about his innovative high-rise pack system. Sebastian is from Australia and developed this high-rise pack after seeing the "Cleveland Load" hose lays that gained popularity in the United States. He designed a pack to not only carry the hose but to become part of a hose management system to increase efficiency on the fireground. The premise of the design is to establish two packs to deliver 200' of 1.75" hose in a variety of situations.
 The Attack Pack is designed to carry 100' of 1.75" hose in a Cleveland Load so that you can deliver a manageable attack hose closest to your entry point. This pack can also be used for a wide variety of hose stretches we very commonly use such as the extended attack, wye'd lines, courtyard stretch, skid load, etc. The Attack Pack has no buckles or zippers and has a very streamlined designed to make carrying and advancing the hose much more efficient. With no buckles you can easily deploy the pack by pulling the "deployment strap" or with sufficient pressure the pack will self deploy when the hose line is charged.
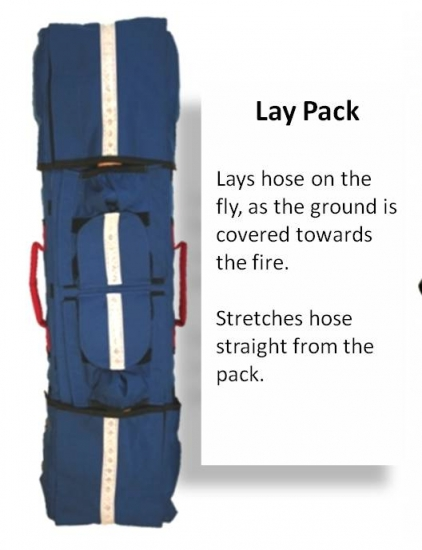
When the Attack Pack is used in situations like high-rise fires or standpipe operations you can use the Lay Pack to bring a water supply to the Attack Pack. The Lay Pack will also carry 100' of 1.75" hose but is loaded with an Accordion Load. This allows the Lay Pack to make the standpipe connection and then the hose will flake out of the pack while it is carried toward the Attack Pack.
For more information on QuickLay Fire Attack you can visit their website at www.quicklayfireattack.com.
Pump Operator Training - Part 2

This is the second video of our five part pump operator training series. We discuss nozzle pressure and how to calculate flow from a nozzle. To understand how to calculate friction loss and pump discharge pressure we must know the flow from our nozzles. This is a very important step for all pump operators. We also need to have a thorough understanding of nozzle pressure, without an understanding of nozzle pressure we will not be able to deliver the appropriate pump discharge pressure. Use this video and our Pump Operator Training Packet to check your nozzles and understand nozzle flow and operating pressures. If you missed Part 1 you can view it by clicking here.
NEW! Pump Operator Training Video Series

We are happy to introduce to you our new five part video training series for driver operators. Over the next several weeks we will be releasing these videos for you to refresh, host training sessions or even prepare for tests or promotions. Take a look at Part 1 below and then continue reading the article to see what other topics we will be covering.
 Here is the breakdown of the topics we will cover in our video series:
Part 1 - Understanding Pump Discharge Pressure and the Components within it.
Part 2 - Calculating Nozzle Flow.
Part 3 - Calculating Friction Loss
Part 4 - Calculating Elevation Gain/Loss and Appliance Pressure Losses
Part 5 - Summary
We have also put together a Pump Operator Training Resource Packet that will go along with this training video series. You can find this resource in the "Downloads" section of our website or by clicking here.
Generation Why? - Part 2

In the last article, we discussed the often maligned generation Y(generation why?). The act of questioning methods and processes can actually advance our cause in technical rescue. This can be achieved with questioning, critical thinking, and constructive debate. In Part 2 we will explore some "why's?" that may close capability gaps or even get people's blood pressure up. We will not cover each of these issues exhaustively, but may revisit some of them in the coming months. So let's fire the first shot...

Why do some practitioners insist on tying a safety or back-up knot in the figure-eight family and some other knots? An overhand safety in the running part of the rope over the standing part does not get actuated. It takes more time to tie the knot properly. It requires some to untie and re-tie to get the tail length correct. Strength is not added to the figure eight with a safety. I have seen people even load the safety side of the knot when tied in the middle of a rope?! Perhaps we should focus on the knot having low gain and being dressed and tied correctly.
Why does the Bowline family of knots get so beat up and ostracized by parts of the rescue community? With the addition of a Yosemite Finish, a double-overhand bend, or slight modification of the knot (double loop / high strength), the bowlines can be reliable, strong, and easy to untie. There are so many varieties of the knot that they can be tied into multi-point anchors, tied in-line, hard-tied into a fixed rope system, and many others.

Why does the Munter Hitch get such a bad rap?
Whistle test? -Perhaps not. Two-person load? –Absolutely. We catch 600-800 lb. loads all the time using the Munter Hitch. The key to success is that the operator must manage slack and plan for some type of edge friction into the system. We use one change-of-direction carabiner. As for the whistle test- what happens if your Engineer is going code-3 into a curve and let’s go of the wheel or has a heart attack? Does the whistle save your people? Should we back-up our drivers with safety-drivers? Or maybe take two SCBAs in a fire. I like many devices and tools out there, but the Munter Hitch has no cost, can catch big loads, can act as a Progress Capture Device, and facilitate twin-tensioned systems in lowering and hauling applications.
I know everyone in US&R has cut-off saws that will allow you to cut just under 5” of depth. Have you ever heard of, or tried a ring saw? As technology improves why has a ring saw not made it into your cache yet? You can achieve 10” of cut depth on a platform that runs on gasoline or hydraulic power. It might really save a team a good amount of time on the dreaded step cut. On a similar note, why is your team only sporting the 27” long Petrogen Torch that comes in the US&R Ensemble but train and work cutting in confined areas such as a 36” culvert. Thirty inches of torch in a 36” of culvert is unwieldy. Why has your team not looked into the 7” Breaching Torch that Petrogen manufactures. It has a 45-degree head rather than the 90-degree. It might be a handy enhancement to your cache when you are tunneling through rebar like pick-up-sticks. How about- Why is the central mode of operations, in training and response, of some overland SAR teams a grid search? With training organizations like NASAR; and programs like FUNSAR, SARTECH Exams, and Managing the Lost Person Incident, there are too many better uses of resources than walking a dress-right-line in the woods. Save that for thorough secondary and tertiary searches or when a rescuer loses his flashlight or keys. Rapid / hasty searches, hailing searches, trailing / tracking, qualified canine assets, and technical search assets are all better options and require diligent practice and training. Active searching and following a heading are day-one skills. Modern searches even use victim profiling and actuarial tables to predict traits and behavior. Have you heard about aerial drones in SAR? Let’s elevate our profession by incorporating modern and practical methods.

Why are we trained to perform a Vent-Enter-Isolate-Search (VEIS) operation with a confirmed child in a working house fire, but we do not enter a confined space with a patient guppy-breathing until it is too late? Firefighters will even circumvent two-in-two-out to save a life in a fire. Permitted Confined Space: a confined space with possible mechanical hazards, low oxygen, electrical hazards, flammable atmospheres, and other such hazards. In fires these hazards are not only a possibility, but rather a certainty. In the VES operation we mitigate these with turnouts-for flash protection, SCBAs for respiratory protection, helmets and PPE for mechanical protection, and speed to reduce time in the hazard space. So why could rescuers not use the same ensemble with the addition of PH-Paper to perform grab-and-go rescues for the guppy-breather in the confined space or even trench realm? Especially if the company officer and competent person can reason that other potential hazards seem manageable. In-and-out. Grab-and-go. Arbitrary fast turnaround. We make OSHA exceptions on the fireground. We are trained to risk allot to save allot. The last why for us to think hard on is- Why did Special Operations stop being special? A very basic Rescue Specialist will at least be up to speed in nine areas: EMS, Hazamt, Rope, Water, Wilderness, Confined Space, Vehicle & Machinery, Trench, and Structural Collapse. Staying on top of these can be a full time job. Trust me. So why do Chiefs and Emergency Managers seem to think anyone can do these things? They put unqualified people on specialized rescues and teams. Everyone deserves to be saved. Our customers deserve a second chance at life. The people we are sworn to protect. Think about your family or kids- do you want the best for them? I do. Why people in high places cannot see this- I don’t know. People have opportunities to take classes. Virtually all 1006 rescue and 472 hazmat classes are free in my state. There is a huge distinction between certified and qualified. I would only trust a small percentage of the students that come through our rescue programs to do the job at the level that the people we protect deserve.
Special Operations participants should be vetted, interviewed tested, refreshed annually, and mentally / physically fit for duty. The percentage of the general population in emergency services, that can perform at this level, is small. Think -FBI HRT, Secret Service CAT, Army Rangers, Coast Guard AST swimmers, Air Force PJs, etc. I would say somewhere in the realm of 3%, in my state, are guys I’d want responsible for my family at a technical incident. Instead team participation and training are used as political poker chips and virtual entitlement programs for the masses. It takes decision makers that have really done the job to empathize with the rescuers and the people being rescued. The they will tell you- “Oh I took the class. It was tough. It was hot. I know how it is. . . “ This is not so. The guy that acts like that guy would probably risk more for his next promotion than he would for a child in a raging creek. That’s no the heart of a real Special Operations rescuer. Rather, they strive to be humble, consummate, professionals. Their calling is tradecraft and a source of pride. They are courageous and daring, not recklessly so, but because of the operators next to him, on his team. Their confidence comes from years of training and experience and the knowledge that the guy next to him would risk all and do all for the team and the people we serve.
 The last one was long, but perhaps touches all of us in this field. It is important to use the knowledge and critical thinking responsibly. You will encounter closed minds and we are obligated to honor SOPs / SOGs within our teams and departments. In closing I would like to reiterate: do not accept old ways and the status quo blindly. Take courses, books, instructors, and check the facts. Conduct equipment trials and firehouse experiments. Try new methods and put the issues in the spotlight. Continue to ask why- just do it in the right way. Quietly and humbly enjoy the wins. Take your losses on the chin and sleep well knowing that you know the answer from firsthand experience.
For a downloadable/printable pdf version of this article click here.
Generation Why? - Part 1

I have heard people in fire and rescue refer to Generation Y, as “generation why?” Sometimes these statements would come down in condescending ways from senior officers on the department. It was usually in reference to the Generation Yer’s asking why a job needed to be done. At least in my case, the senior guys typically misunderstood my intentions. What I was actually doing, instead of complaining or being insubordinate, is trying to understand the end goals and purpose of a job-so as to maximize the outcome and efficiency. We are the generation that changes their email passwords on Outlook, help insert functions into Excel, and a host of other daily tech solutions- so maybe we can come up with a better way, faster way, or more positive outcome. –But not necessarily by blindly following orders. In other words- asking why is not a bad thing. In fact, its what I contend rescuers should do more often.

Generation Y is generally considered to be those born during the 1980’s and early 90’s. Stereotypes for Generation Y include laziness, a sense of entitlement, and requiring praise. In actuality this demographic is very “tech savvy” (think gear), ambitious, family oriented, and are team players with good communication skills. The latter are desirable characteristics, but the “why” and the questioning is a characteristic that should transcend all generations on the job. So let’s set the stage for this reasoning. . .
Question Everything! Consider that an order. Not at the wrong time. Not during an emergency. Not in an insubordinate or disrespectful way. Remember your station in the department and be always humble. Asking why we do something is the first step in understanding SOP/SOGs, our history and the mechanics of the problem. I have little patience or regard for statements like “Because we have always done it that way,” “Just because I said so,” The words “always” and “never” used too liberally in rescue. And finally the perpetual get-out-of-jail-free words. . . “for safety” -without due explanation.
Meaningful questioning elevates rescuers to a world of critical thinking. Critical thinking is defined as "the process of actively and skillfully conceptualizing, applying, analyzing, synthesizing, and evaluating information to reach an answer or conclusion" and also "disciplined thinking that is clear, rational, open-minded, and informed by evidence"(dictionary.com). Our end goal is to improve the mission to save those that others cannot, all-the-while keeping our rescuers as safe as is prudent. To accomplish this we must continually evaluate and ask “why do we do the things we do?” and “how can we improve our mission?”
There are answers out there. Rescuers must seek them out. One might start at the station or home front. The next source may be on the web, in books, or videos. Let’s also focus on the instructors: if your instructor cannot satisfactorily answer “why,” then you need to find a new one or seek knowledge elsewhere. There are allot of hacks and parrots out there that are mass-produced and label themselves instructors. Instructors aren’t supposed to know everything, but a good one will admit that, and know how to find the answer to your question.
In the next article, we will examine some rescue "why's?" that will generate some spirited debate around the day room. We won't cover each topic exhaustively, but we will open the door to some research and critical thinking.
You can download or print a PDF copy of this article by clicking here.
Can You Push Fire? YES!

I can't tell you how many people I have heard say "You can't push fire, they proved it". Well they (NIST and UL) produced an incredible amount of research for firefighters to use in order to make conditions safer and tactics more effective. I have seen countless firefighters throw around the "push fire" term as if it were a catch phrase. The fact of the matter is that an inappropriately used hose stream can and will "push" fire. Now, I know many of you are thinking that the hose stream isn't pushing the fire and that I am wrong in saying that. Well, call it what you want but a hose stream can manipulate the flow paths that we are talking about and whether you believe the stream itself is moving the fire or the influence of that stream is changing the flow path, both cause the fire to migrate to other areas. In my next few articles I will be showing you some videos I am putting together about nozzle selection and the effects of fog nozzles, smoothbore nozzles and their uses. Until then watch the video below and you answer the question "Can you push fire?".
If you have watched the above video and still think we cannot push fire with a hose stream then what would you call it? We can argue that the "Water" isn't pushing fire and I completely understand that debate. However, if we continually tell new firefighters that water cannot push fire then we are leaving out a massive amount of information that they need to know. I believe it is much more important for us to agree that using our nozzles incorrectly can contribute to fire migrating to other areas of the structure than to say that it doesn't and that the change in ventilation or flow path is what caused it.
I will spend much more time in the coming articles explaining the movement of air with nozzles, pressurization of spaces with nozzles and the relationship between GPM, Nozzle Reaction, Heat Absorption, and the advantages and disadvantages of the smoothbore nozzle and the fog nozzle.
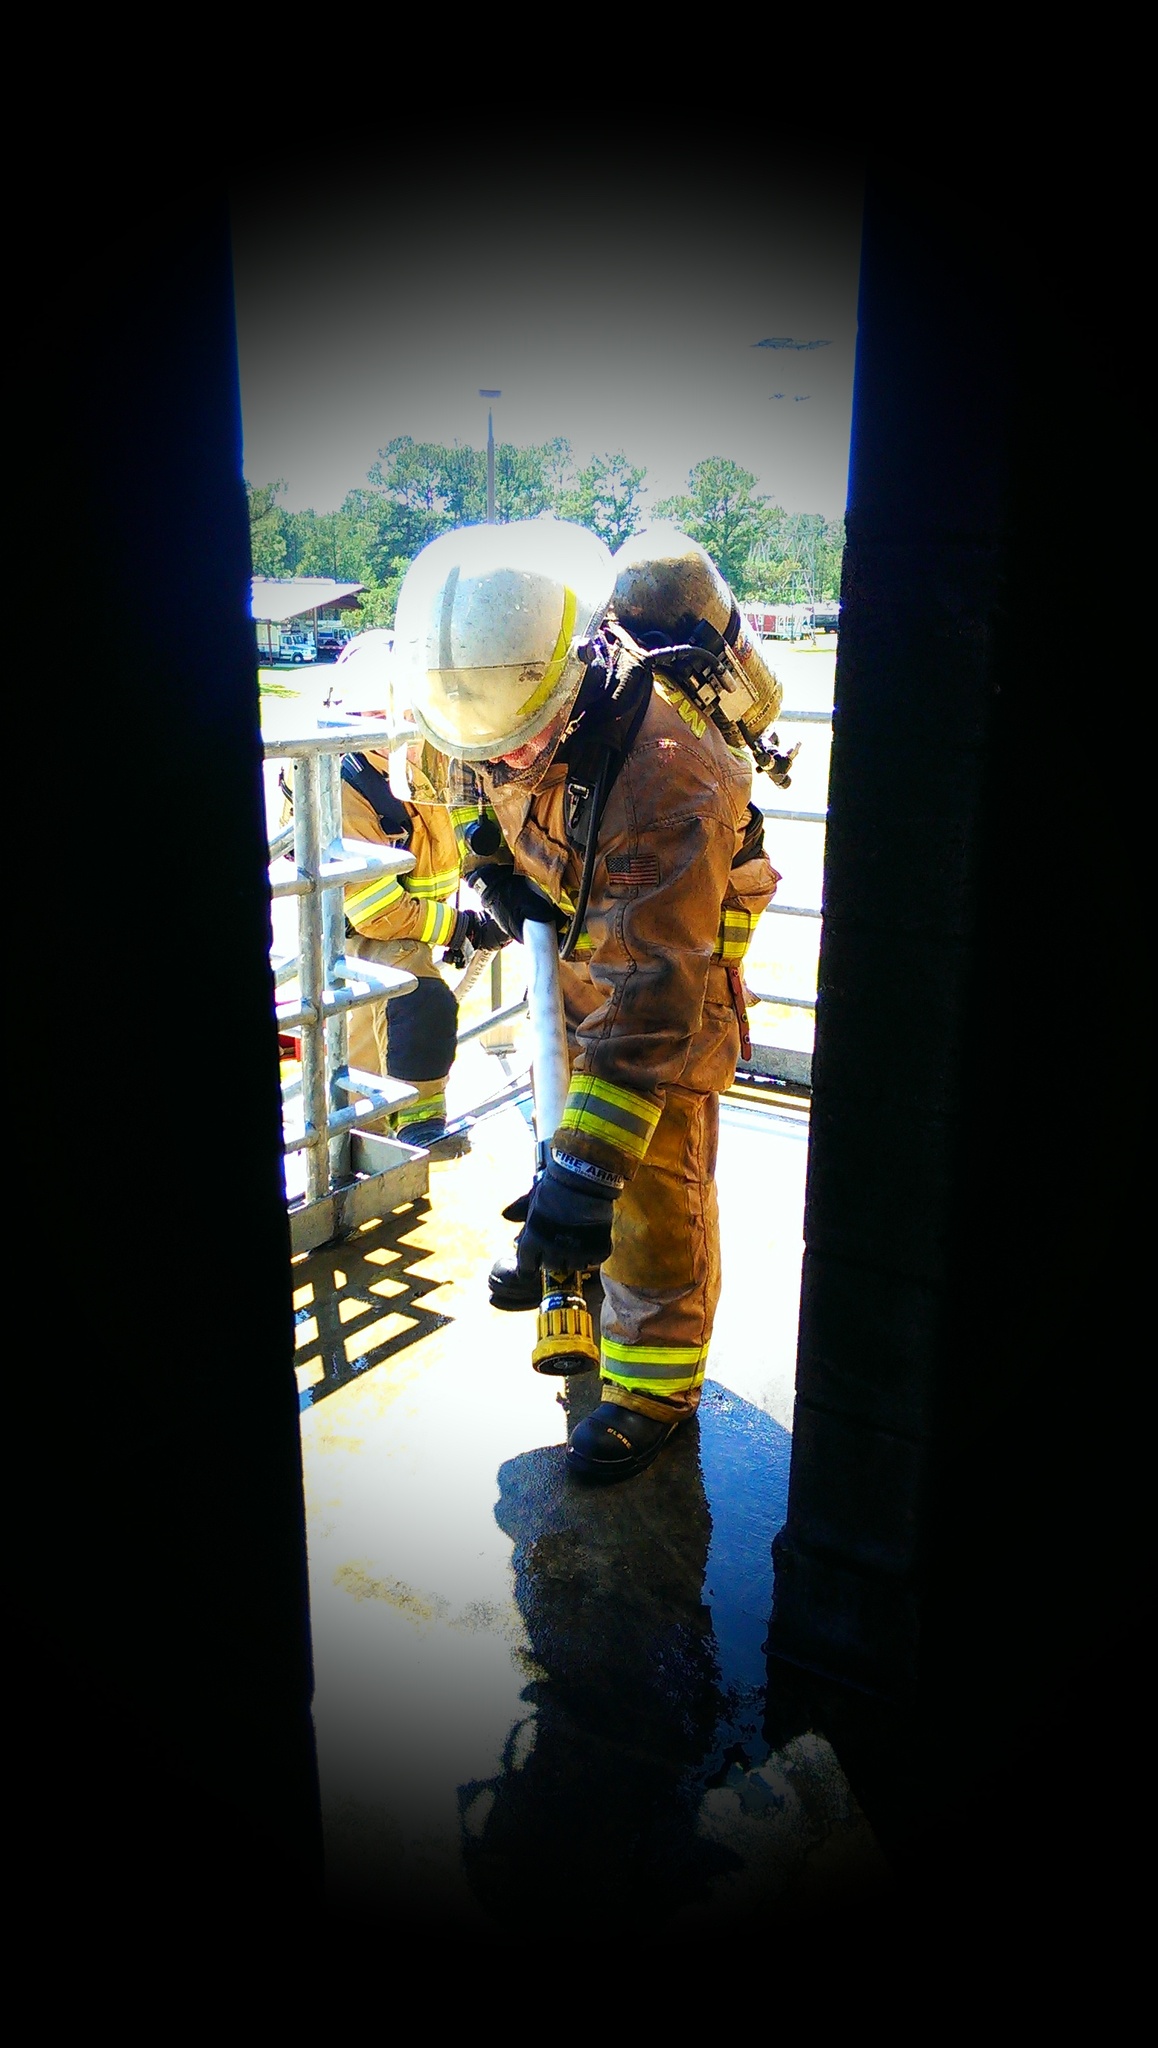
Hand Method for Friction Loss

In my last article, I talked about memorization as a method for figuring friction loss on the fire scene. In this article we will talk about another fire ground method… the hand method. This method requires a little bit of arithmetic that can become confusing in stressful situations. However, it still is a simple method that can be easily mastered. There are a lot of extremely good pump operators out there that prefer this method. It is similar to the memorization method, in the sense that we will be talking about 1 ¾ diameter hose and all friction loss is figured in 100 feet hose lengths. One major difference between the two is the fact that the memorization method is exact and the hand method is not. It will be plus or minus a couple of psi every time you figure it, but differences will be minuscule and you will probably never find them on the pump panel. Keep in mind this is still just friction loss. You will still have to add your nozzle pressure in order to get your pump discharge pressure. We have provided a training video below but if you continue reading we will go into detail about how to use the Hand Method for calculating friction loss.
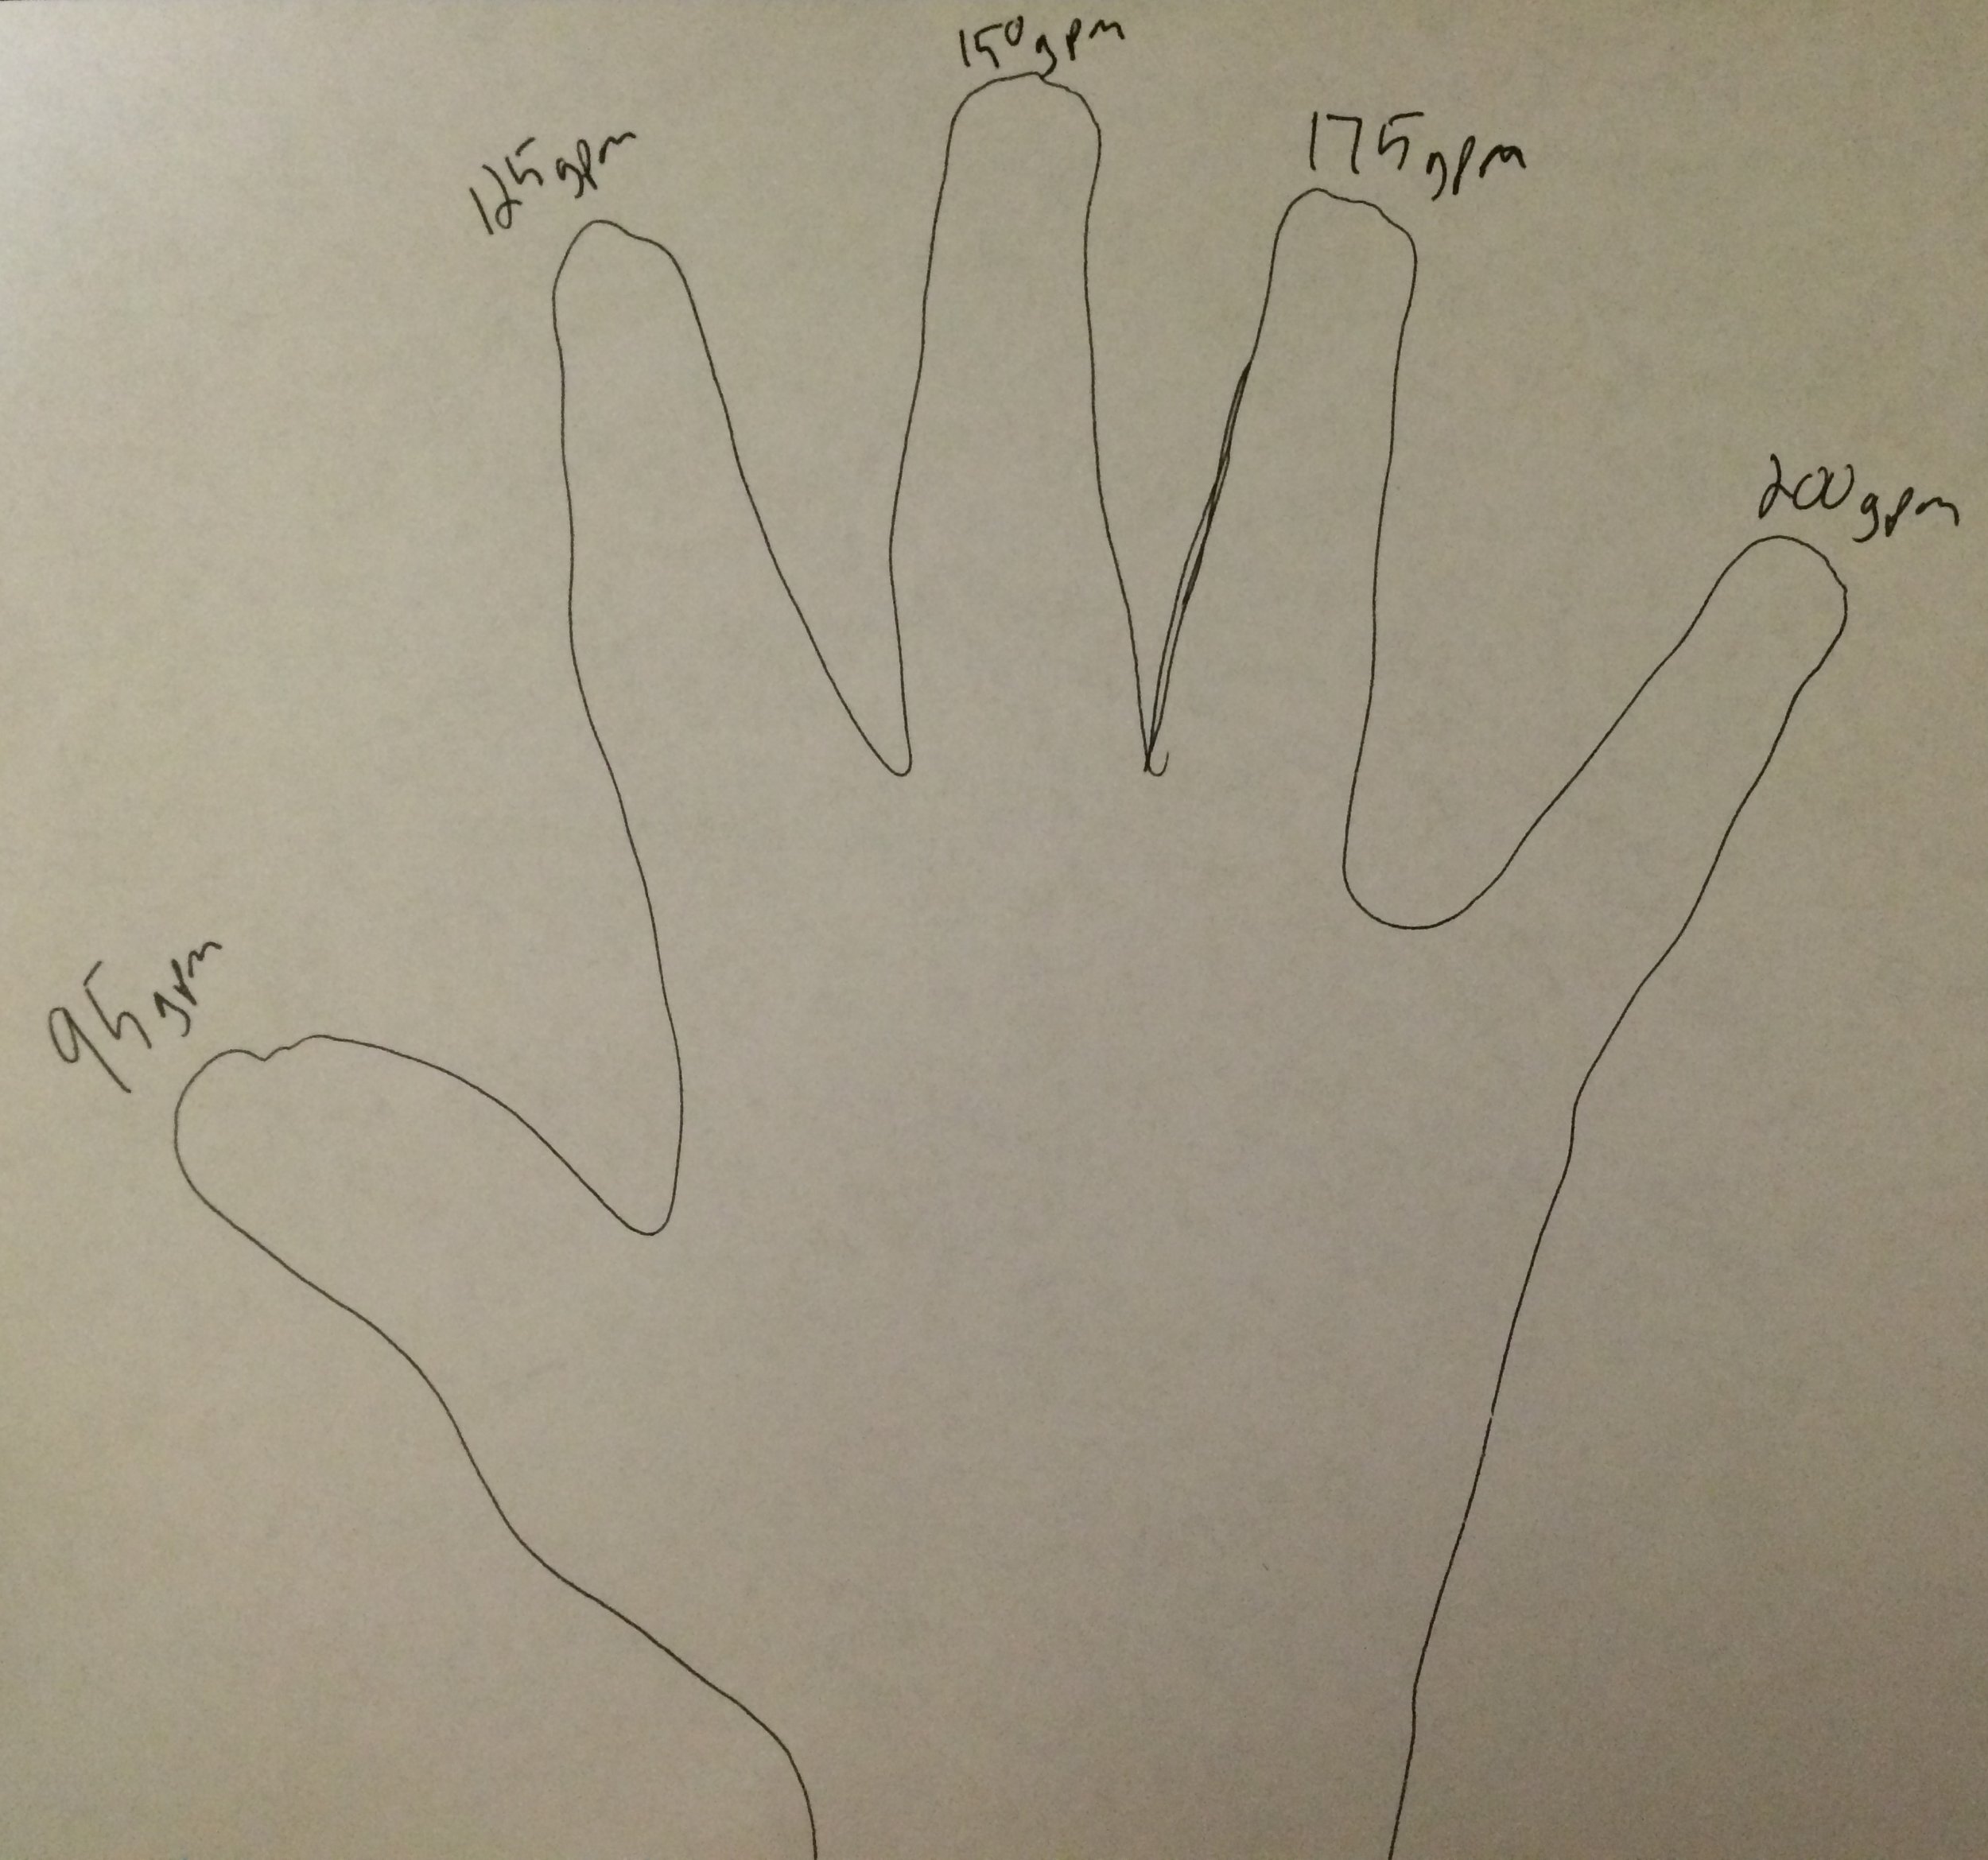
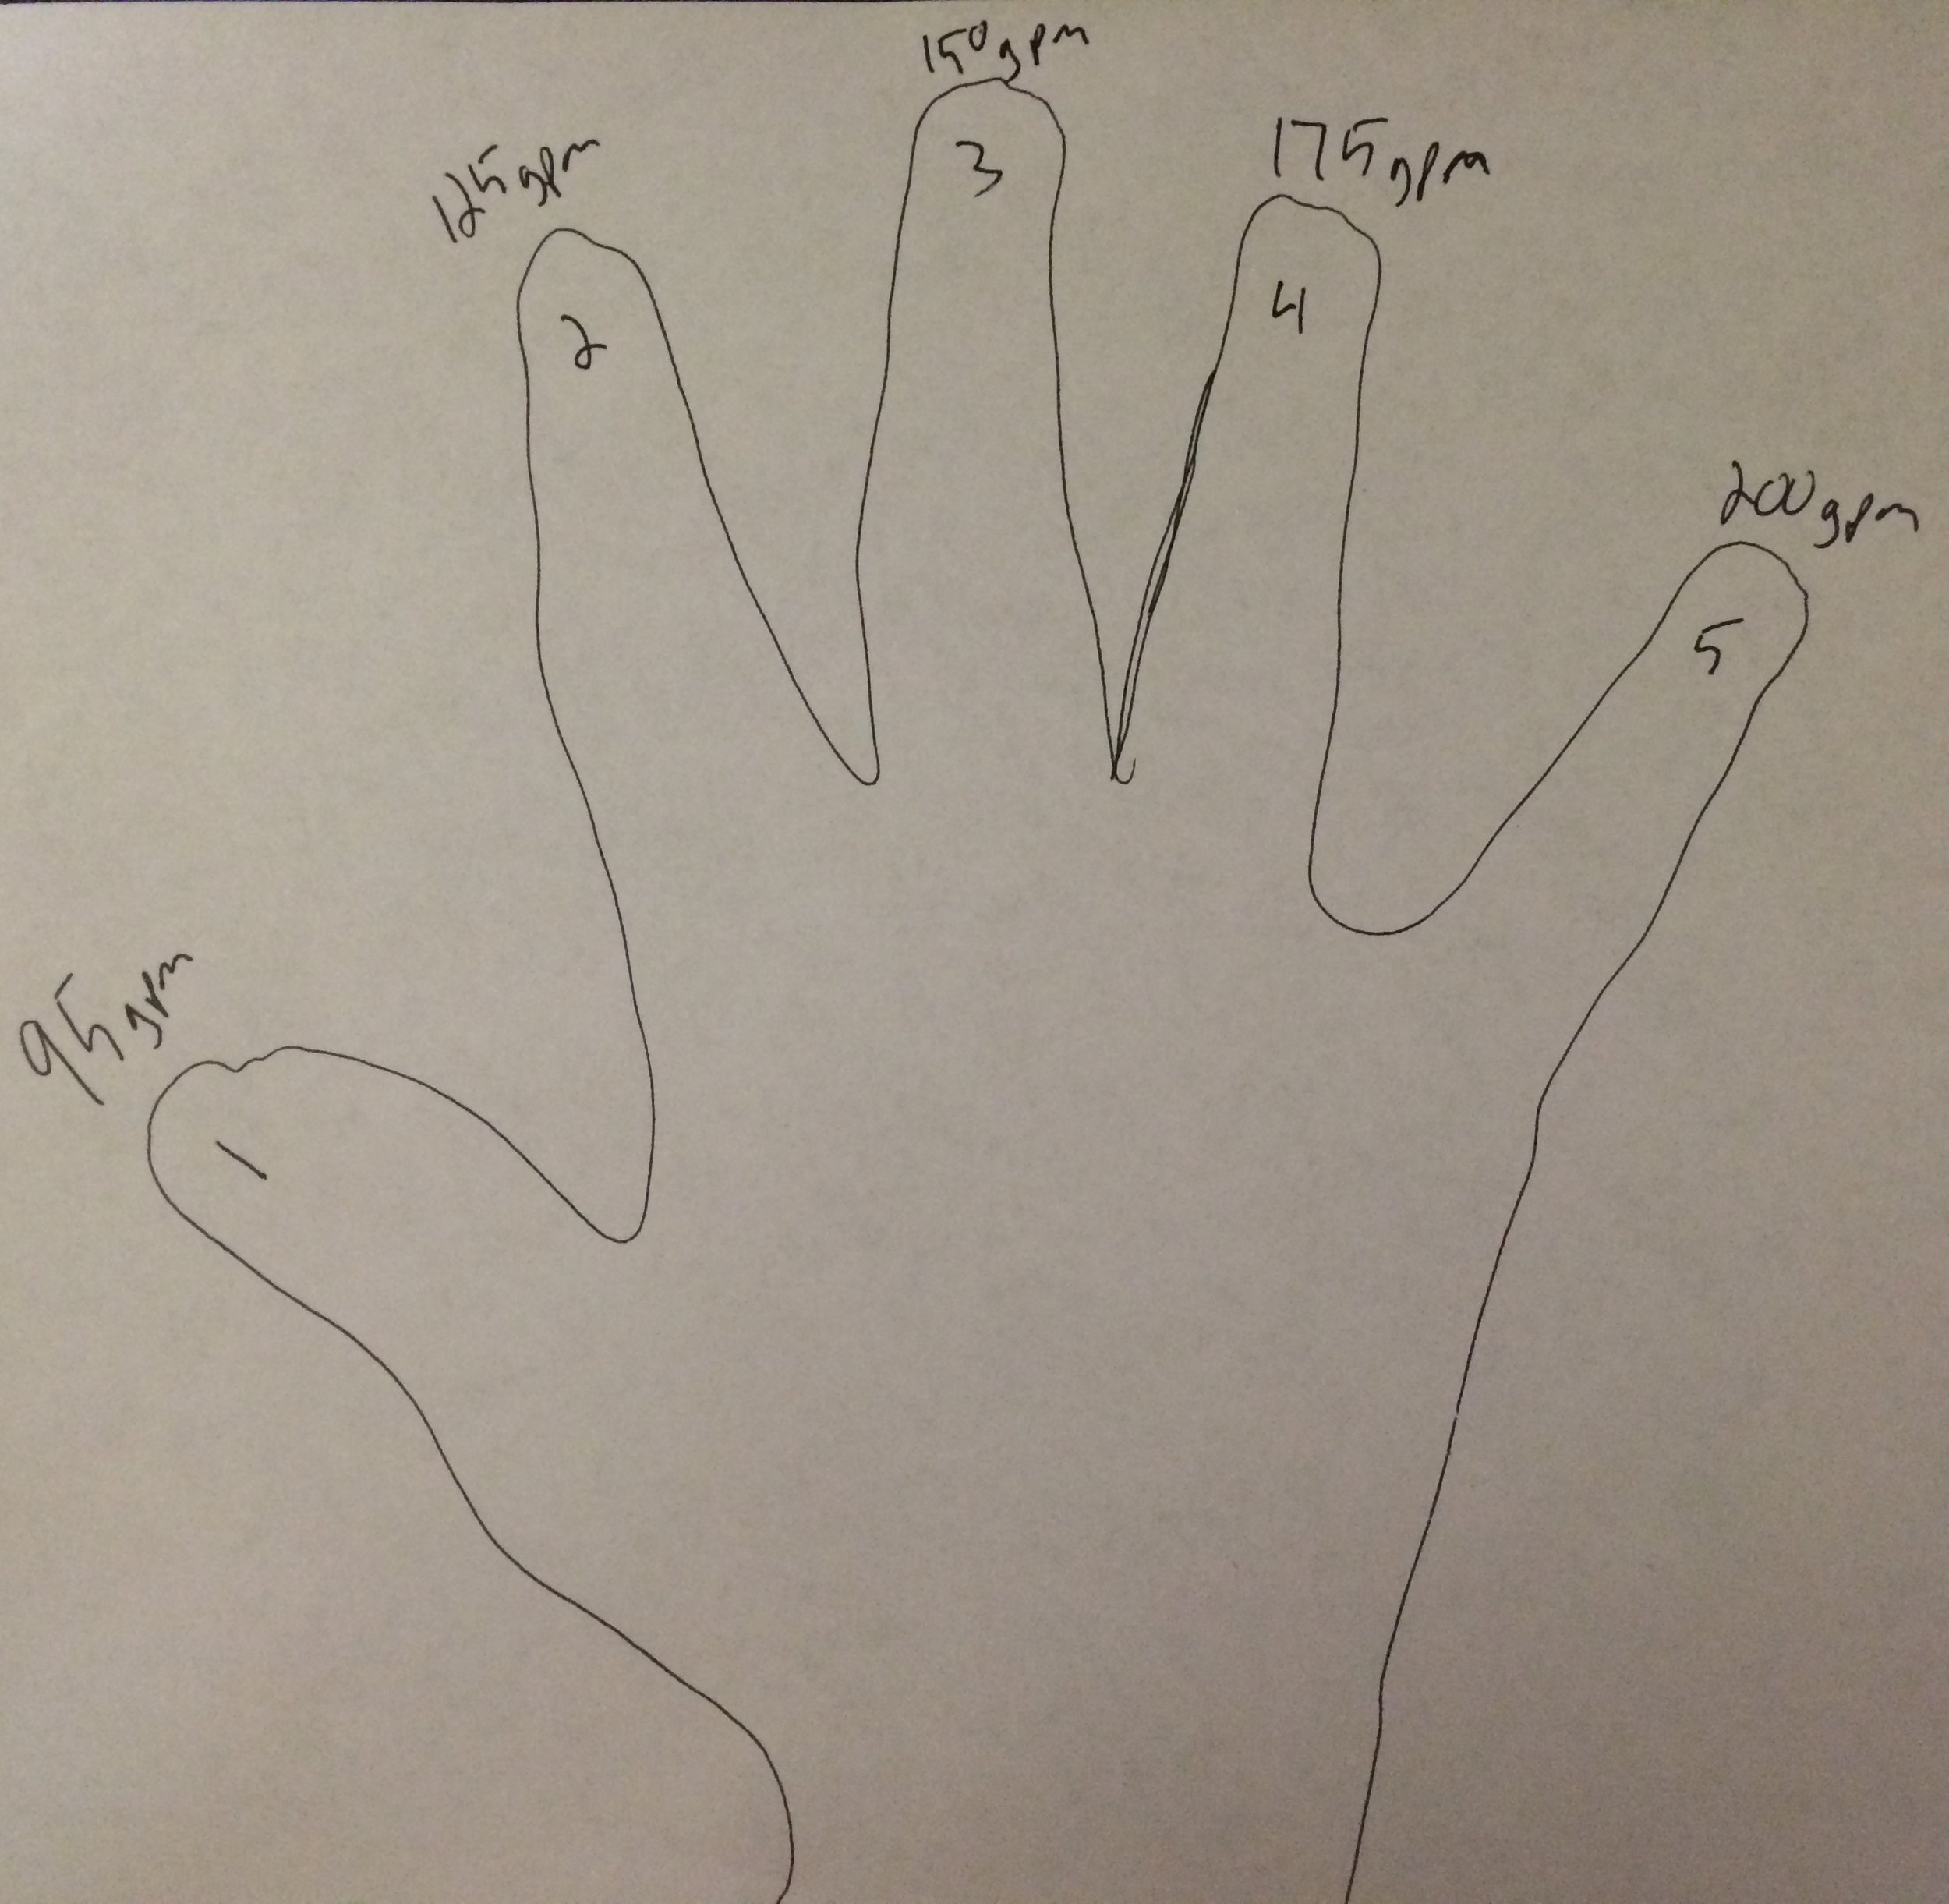
So, lets get started. Here again we will be talking about fog nozzles. Remember, most fog nozzles have four gallons per minute settings… 95gpm, 125gpm, 150gpm, and 200gpm. Now, hold up your left or right hand and spread your fingers. I’m right handed so I will be using my left hand for my descriptions. Imagine your fingers are the gallons per minute settings on the nozzle. Starting with your thumb. The thumb will be 95, index finger 125, middle finger 150, ring finger 175, and pinky finger 200. You can also use these GPM settings for rough estimates on smoothbore nozzle flows if you know them.
STEP 1
The first step is to imagine your GPM settings across your fingertips. This would start with the thumb (95 or 100 GPM) then continue across the remaining fingers. (125, 150, 175, 200 GPM).
 STEP 2
The next step is to number your fingers 1-5. You start by placing the #1 on your thumb followed by 2, 3, 4, and 5 on the remaining fingers.
 STEP 3
To finish setting up your hand method you will imagine the number 12 in the palm of your hand.
In order to figure the friction loss, all you have to do is multiply 12 by whatever number or finger you need to use. We will use the same scenarios as we did in the last article.
Lets say you are driving one day and you pull up to a car fire. Your officer and firefighter pull the 100ft jump line and you know you need to be flowing 95 GPM. So, you look at your hand and you notice 95 GPM is at the number 1 position. Multiply 1 x 12.
1 x12 = 12psi
That equals 12. Twelve is your friction loss. If you have a 100psi nozzle just add 100psi. 12psi friction loss plus 100psi nozzle pressure equals 112 pump discharge pressure.
12psi + 100psi = 112psi
You are probably thinking that this isn’t right because it doesn’t equal exactly 114 like the other method. And you are right, it doesn’t. However, I do not know a firefighter in America that can feel a 2psi difference on the end of the nozzle. Its not exact but it will work efficiently.
Next scenario, you are at a structure fire that requires a 200ft line flowing 200gpm. The 200gpm setting is at the number 5 position on your hand, just multiply 5 x 12. It equals 60.
5 x 12 = 60psi
That is 60psi friction loss per 100ft. We have a 200ft line so 60 plus 60 is 120psi total friction loss. Then add your nozzle pressure, 120 plus 100 equals 220psi.
60psi + 60psi + 100psi = 220psi
That is your pump discharge pressure. The exact pump discharge pressure for this scenario would be 224. Here again, I do not know any firefighter that can tell a 4psi difference on the nozzle. If you are using 75psi low-pressure nozzles, it works the same way; just add 75 instead of 100. In terms of friction loss and pump discharge pressure, there are several ways to figure it. On the scene, there are multiple ways to determine friction loss and only one wrong way; that is not getting a proper amount of water to your firefighters. Without it, they can’t put the fire out and could be put in some serious situations because of it. You, as a pump operator, have to figure out how you want to do it. It may be the hand method, memorization, or something else. It doesn’t matter as long as you get the right amount of water to the guys on the nozzle. I hope one of these methods will work for you and next time we will be discussing the Subtract 10 method for calculating friction loss in a 2.5" hose.
Mutual Aid for Memphis
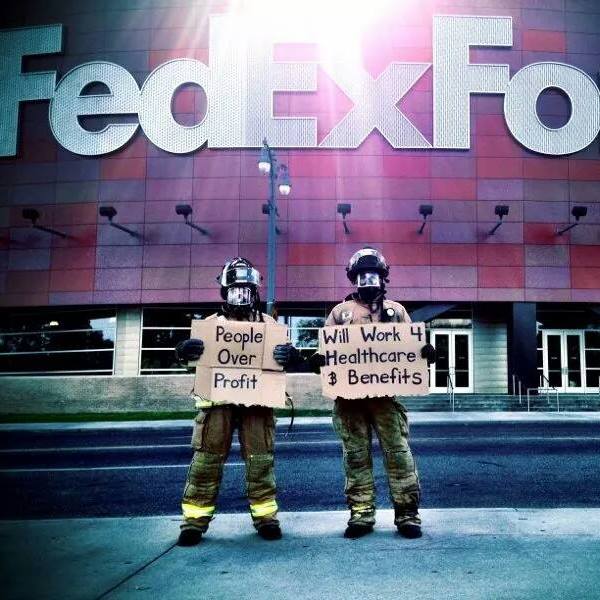 Memphis firefighters have had their share of struggles throughout the past few years. The economic climate has led to station brownouts and company closures. Now the City of Memphis is attacking the benefits provided for members and retirees. Over the past few years I have had the privilege of meeting, riding and training with members of Rescue 3 in Memphis and I cannot express to you the commitment they have to protecting their citizens. These members are extremely busy and fight working fires nearly everyday.

It amazes me to see the latest solutions to the city's budget problems is to push the financial burden onto the very people that work to protect it. These members have already sacrificed so much for the city and now they are hitting their personal finances. I know of several Memphis firefighters who have had major surgeries and injuries due to the work they perform. These same members have witnessed LODD's and felt the impact we never want to experience. Here is a video reporting the issues from Action News 5 - Memphis, Tennessee The financial impact of firefighter's insurance premiums is utterly shocking.
- Basic Plan Family premiums will rise from $320.05 per month to $921.90; an annual cost of $11,062.80.
- Premier Plan premiums rise from $334.32 per month to $1,328.19; an annual cost of $15,938.28.
These numbers are hard to fathom and during all of these budget battles the City of Memphis is moving forward with a $66 million dollar mall redevelopment...
So how can you help our brothers to provide mutual aid for Memphis. Share this information with anyone you know in the Memphis area, help educate the public on what is happening to their firefighters and police officers and join the I Have Been Negatively Affected by The City Of Memphis Council Vote!! Facebook page for more information.
Denver Fire Department: Leadership So Everyone Goes Home

The National Fallen Firefighter's Foundation has just released it's newest Everyone Goes Home video with the Denver Fire Department. Take the time to watch this and share it with your crews. The National Fallen Firefighter's Foundation has produced some great content to help other departments learn from one another.
 I am currently the Lead State Advocate for Everyone Goes Home in the State of Mississippi. If you are unfamiliar with Everyone Goes Home check out the links I have provided that will send you to your own Advocates. They can help you get training material and resources to use at your own fire department. You will find a tremendous amount of resources on the website www.EveryoneGoesHome.com
Here is the link to the Learning Media Center
Here is the link to the Firefighter Life Safety Toolbox Resources
Here is the link to the Video Resources
Here is the link to find your Local State Advocates
Here is a final video message from Chief Billy Goldfeder:
NFFF Cold Water Challenge!

Here is my version of the National Fallen Firefighter's Foundation "Cold Water Challenge". The concept is to challenge five of your friends in order to raise money for a charity of your choice. Instructor Mike Word and myself were challenged by two firefighters in Mississippi; Chris Johnson (Southaven FD) and Mike Hancock (Walls FD). If you accept the NFFF cold water challenge you donate $10 to the NFFF. If you do not accept you are supposed to donate $100 to the NFFF. I decided to challenge the Alabama Fire College, TEEX Fire and Emergency Training, South Carolina Fire Academy, LSU Fire and Emergency Training Institute, and John Russell of the Mississippi State Fire Marshall's Office. We had a great time participating in this event and look forward to more of them.
Here are some pictures from our challenge:


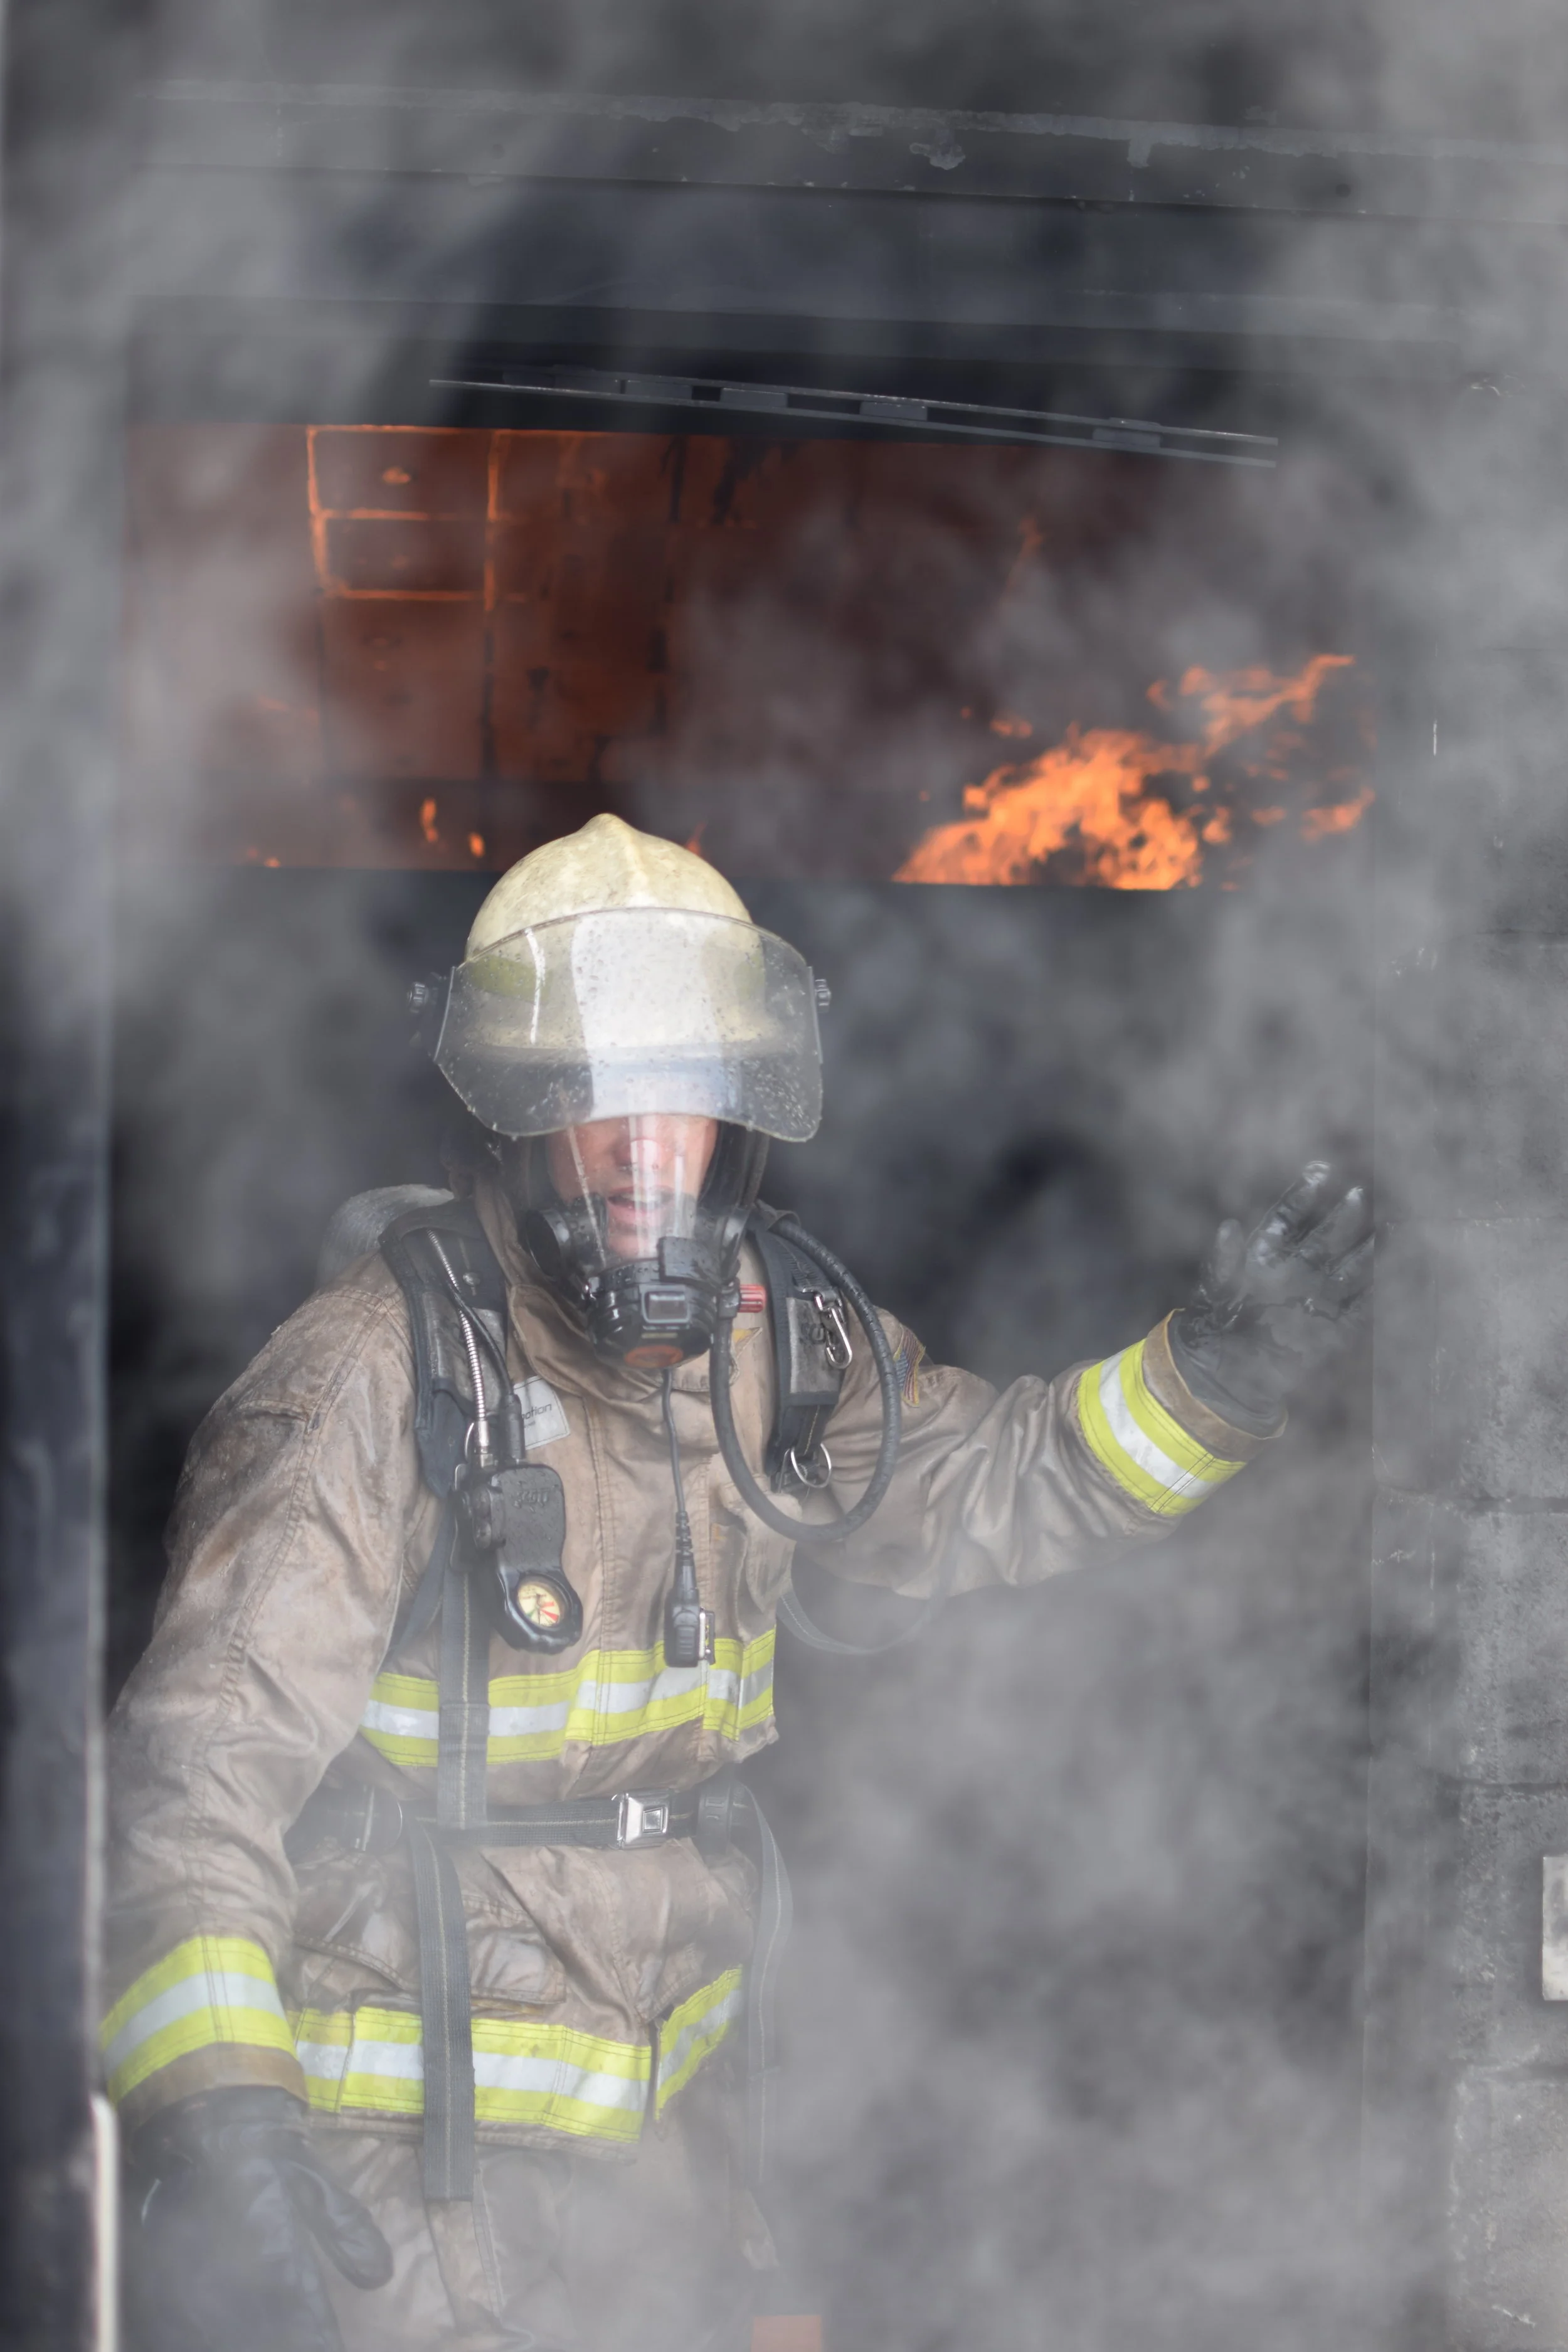
LP Live Fire - Helmet Cam Footage

Check out this helmet cam footage from the Mississippi State Fire Academy during a recruit class Night Burn. This is filmed from a helmet cam attached to an instructor during the LP live fire training for the NFPA 1001-I-II basic recruit course. During the evolutions students learn to control and isolate valves for LP fire events and also fight a simulated vehicle fire. You will see a highlight reel from three different burn props; the Vehicle Fire, "Christmas Tree", and the Pump Flange.
Video was shot with a Fire Cam Mini HD helmet cam.
The footage you saw was filmed at the Mississippi State Fire Academy's LP Live Fire area which consists of five large concrete pads designed specifically to prevent environmental contamination. These training areas include: a fifty foot flowing fuel fire (LP gas Christmas Tree fire); LP gas tank fire; LP gas tank fire; pump seal fire; twenty foot vertical tank fire with exposures; horizontal tank fire with an exposed small tank truck; and a three story evolution simulating a chemical processing plant fire.
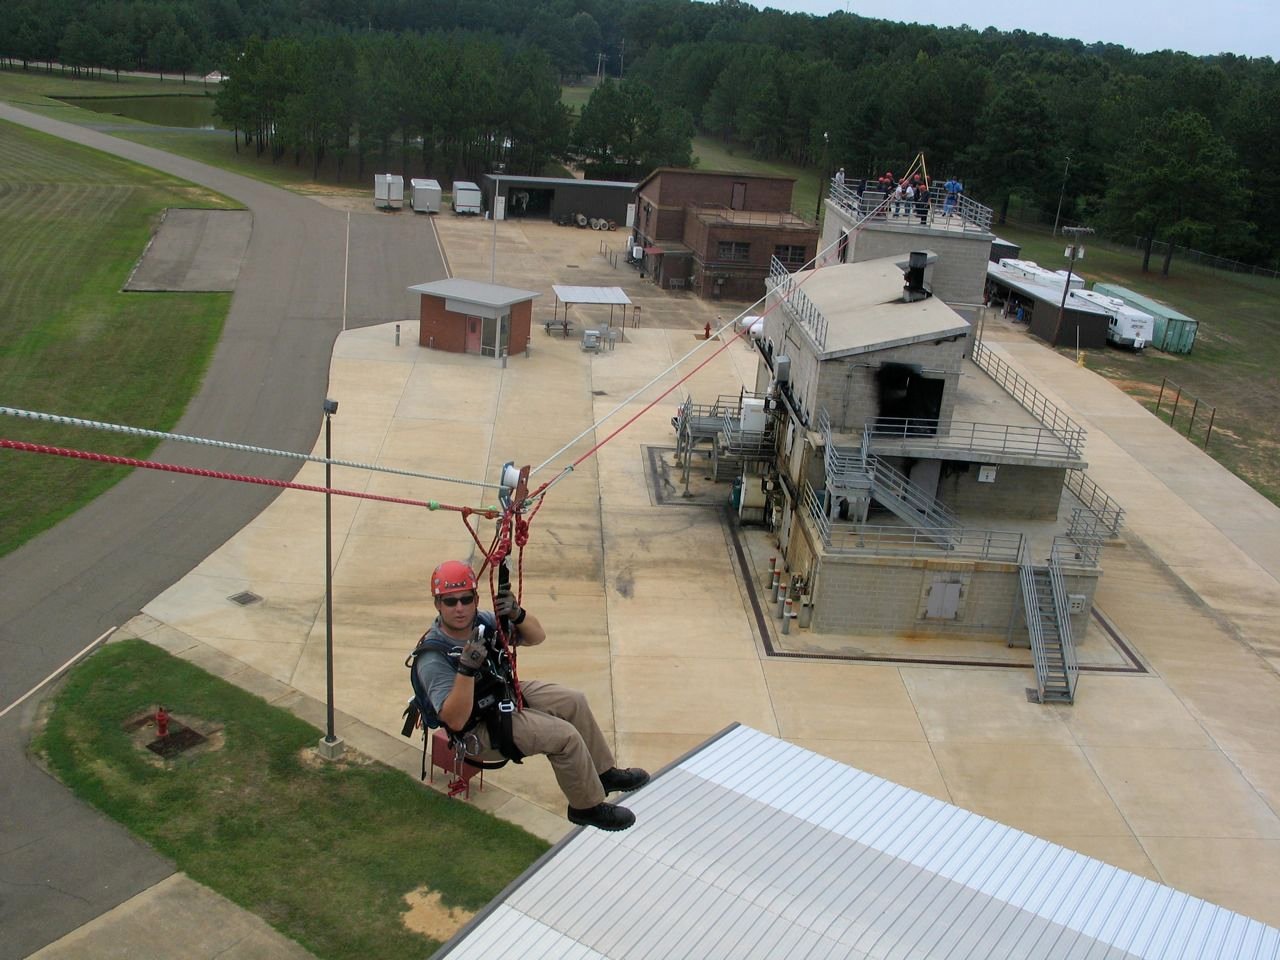
The Mississippi State Fire Academy is located just outside the capitol City of Jackson in Rankin County, Mississippi, on eighty five acres. The Academy features a Fire Research Building which simulates a three-story residential structure with an attic, and a commercial structure with a basement. The building contains over 4,000 square feet of training space and is equipped with five computer controlled fire/smoke rooms and a Class A burn room with a liquid propane gas fueled fire simulator. A four (4) story drill tower is also attached to the burn area.
The campus also features a five-story Drill Tower which provides opportunities for high-rise ladder, rope and firefighting operations. In addition to this tower, there is a communications tower erected for training purposes. There is also a Hazardous Materials training site consisting of a large train derailment simulation with eleven cars. Railcars are movable and the training site is piped with liquid/vapor propane for simulated fires and leak simulators.
BullEx Live Fire Demonstrations at FDIC 2014

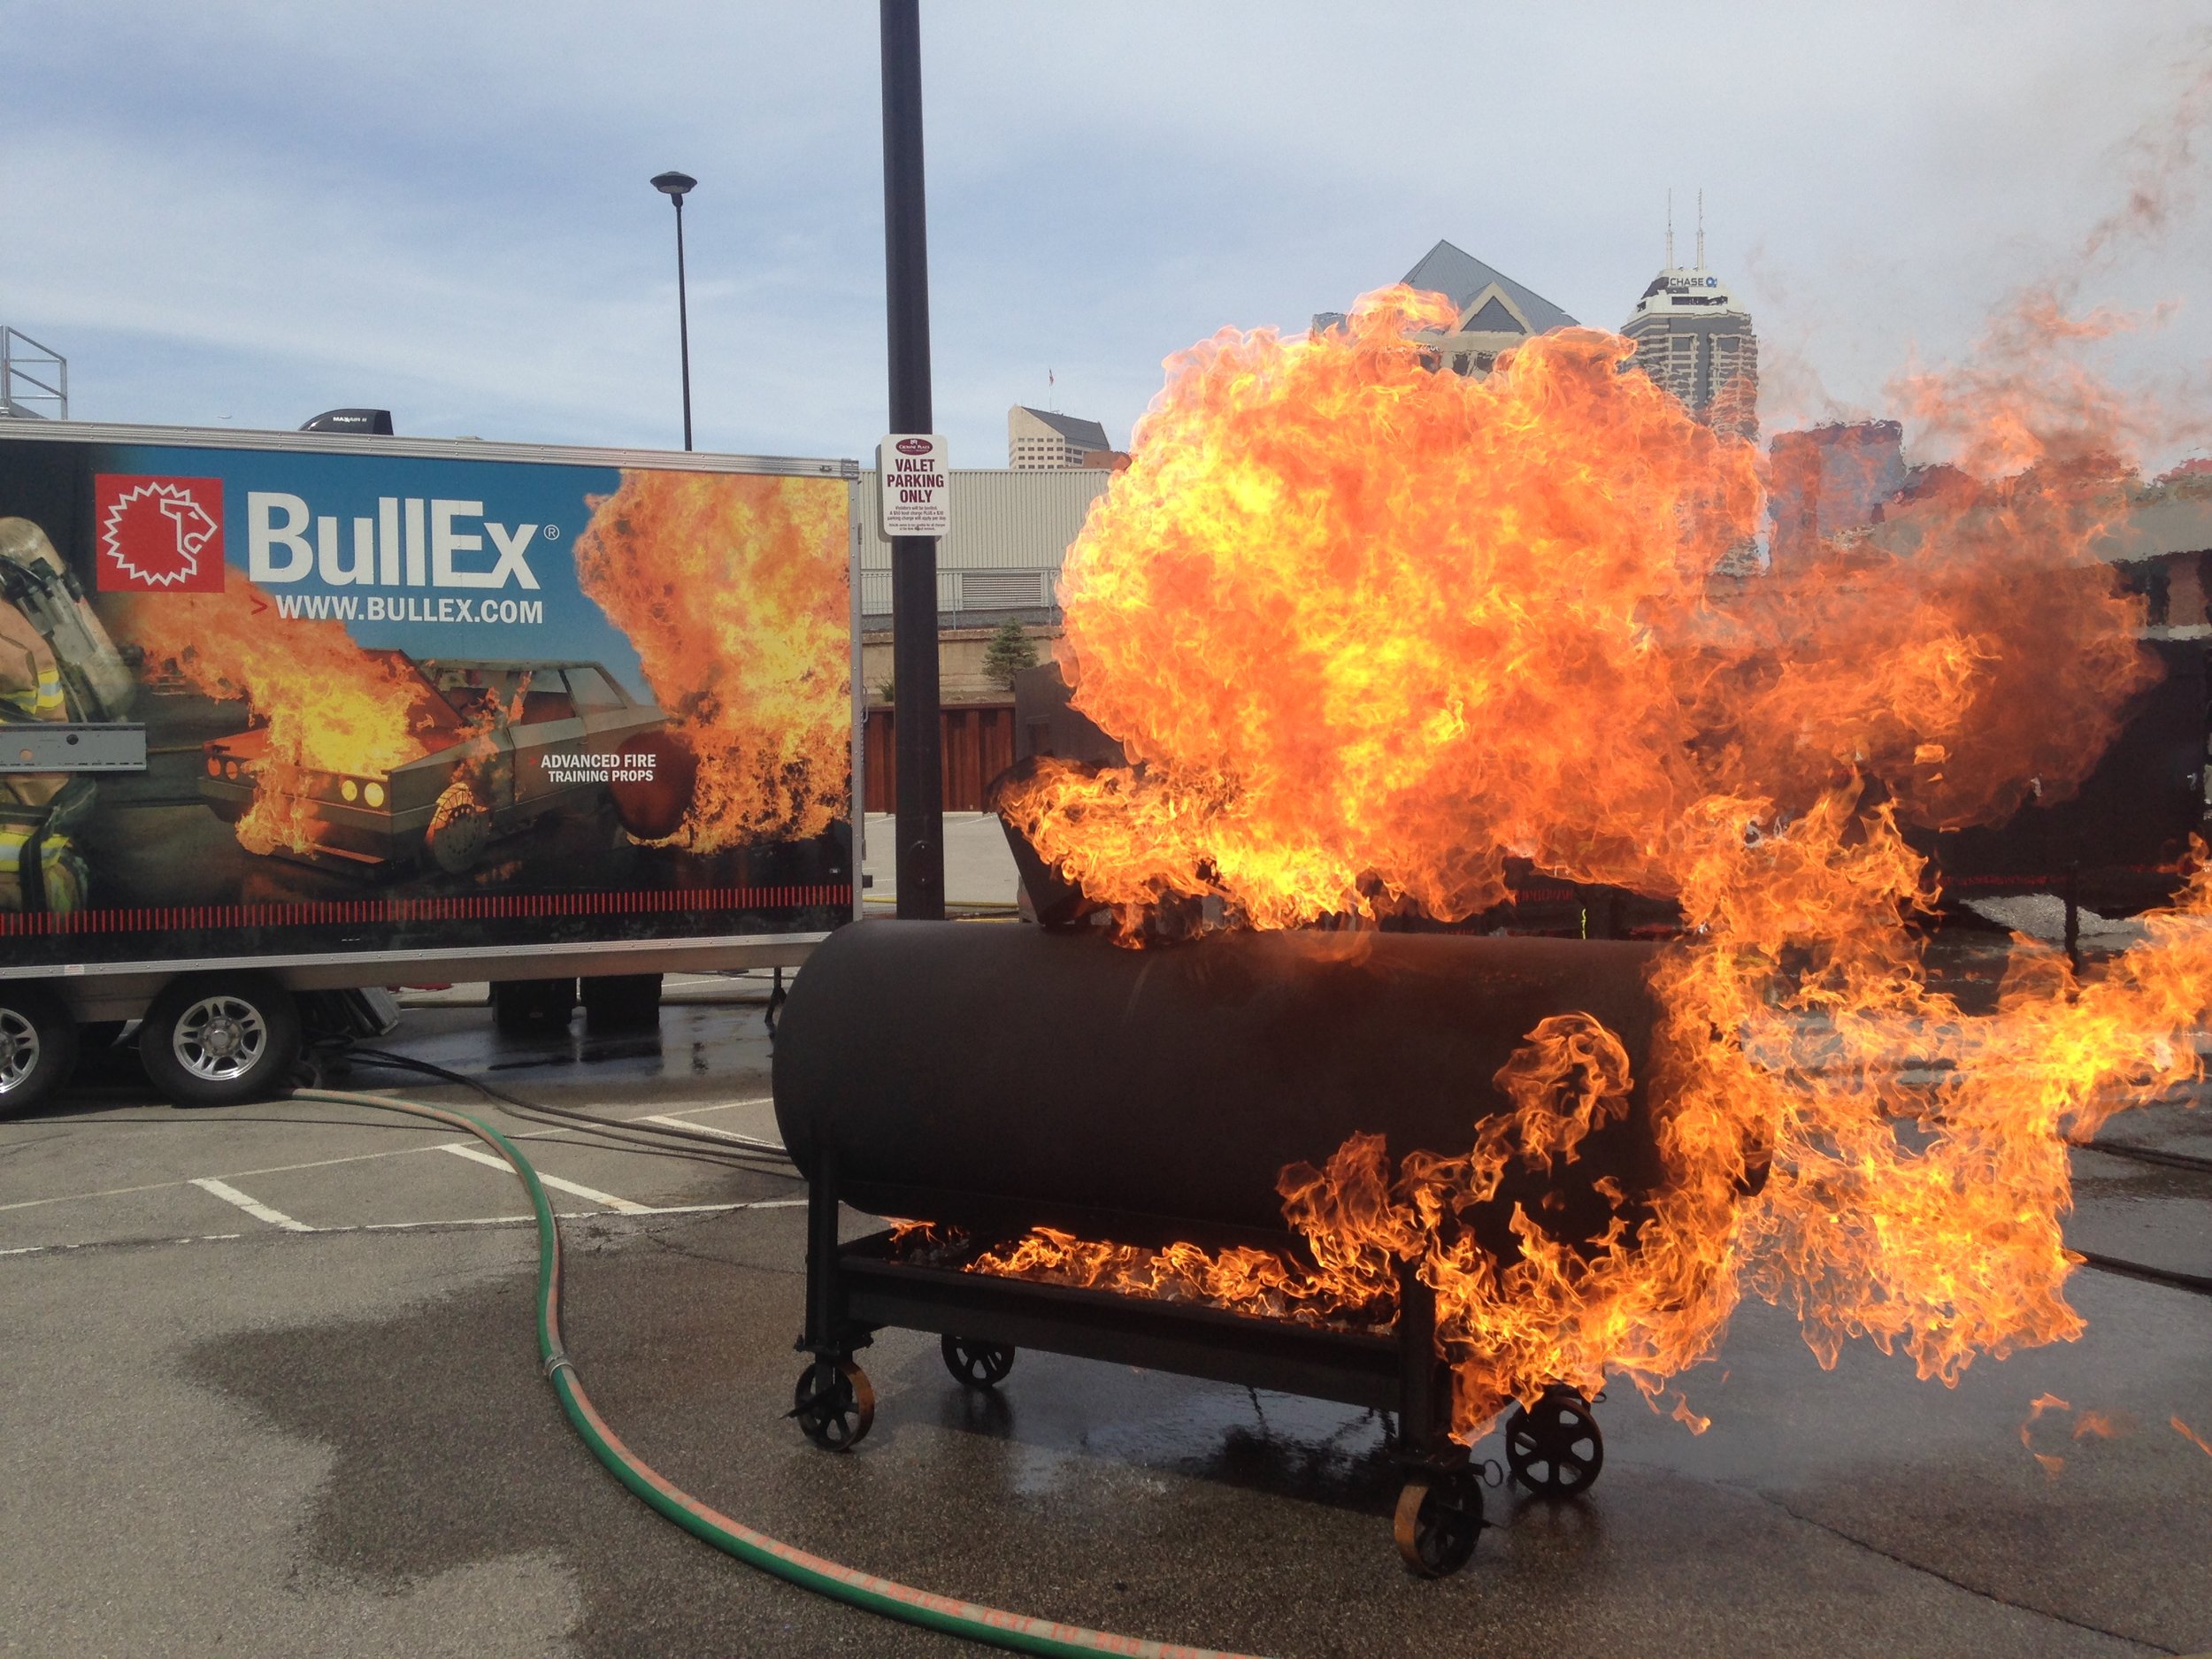 I put together a few quick clips from the FDIC 2014 BullEx live fire demonstrations for you to see. They showed off their Gas-Fired training props and their Digital Fire training props. During the live fire demonstration you can see them attacking a pressurized vessel fire simulating something like a propane tank with a pop-off valve. You will also see them entering a structural fire prop with a Gas-Fired prop on the first floor and a Digital Fire prop on the second floor. The BullEx Digital Fire training system uses a screen to produce the "fire" image and a smoke machine to generate the smoke inside the structure. You can use a nozzle to attack the fire and the screen senses the flow and will dim as you extinguish it. It produces a very realistic look inside when combined with the smoke generator.


BullEx also had their dumpster and grill live fire props for you to view. These are propane fired props controlled remotely. Lastly, take a look at the inside view of the new digital fire training system.
Are you USAR Ready?

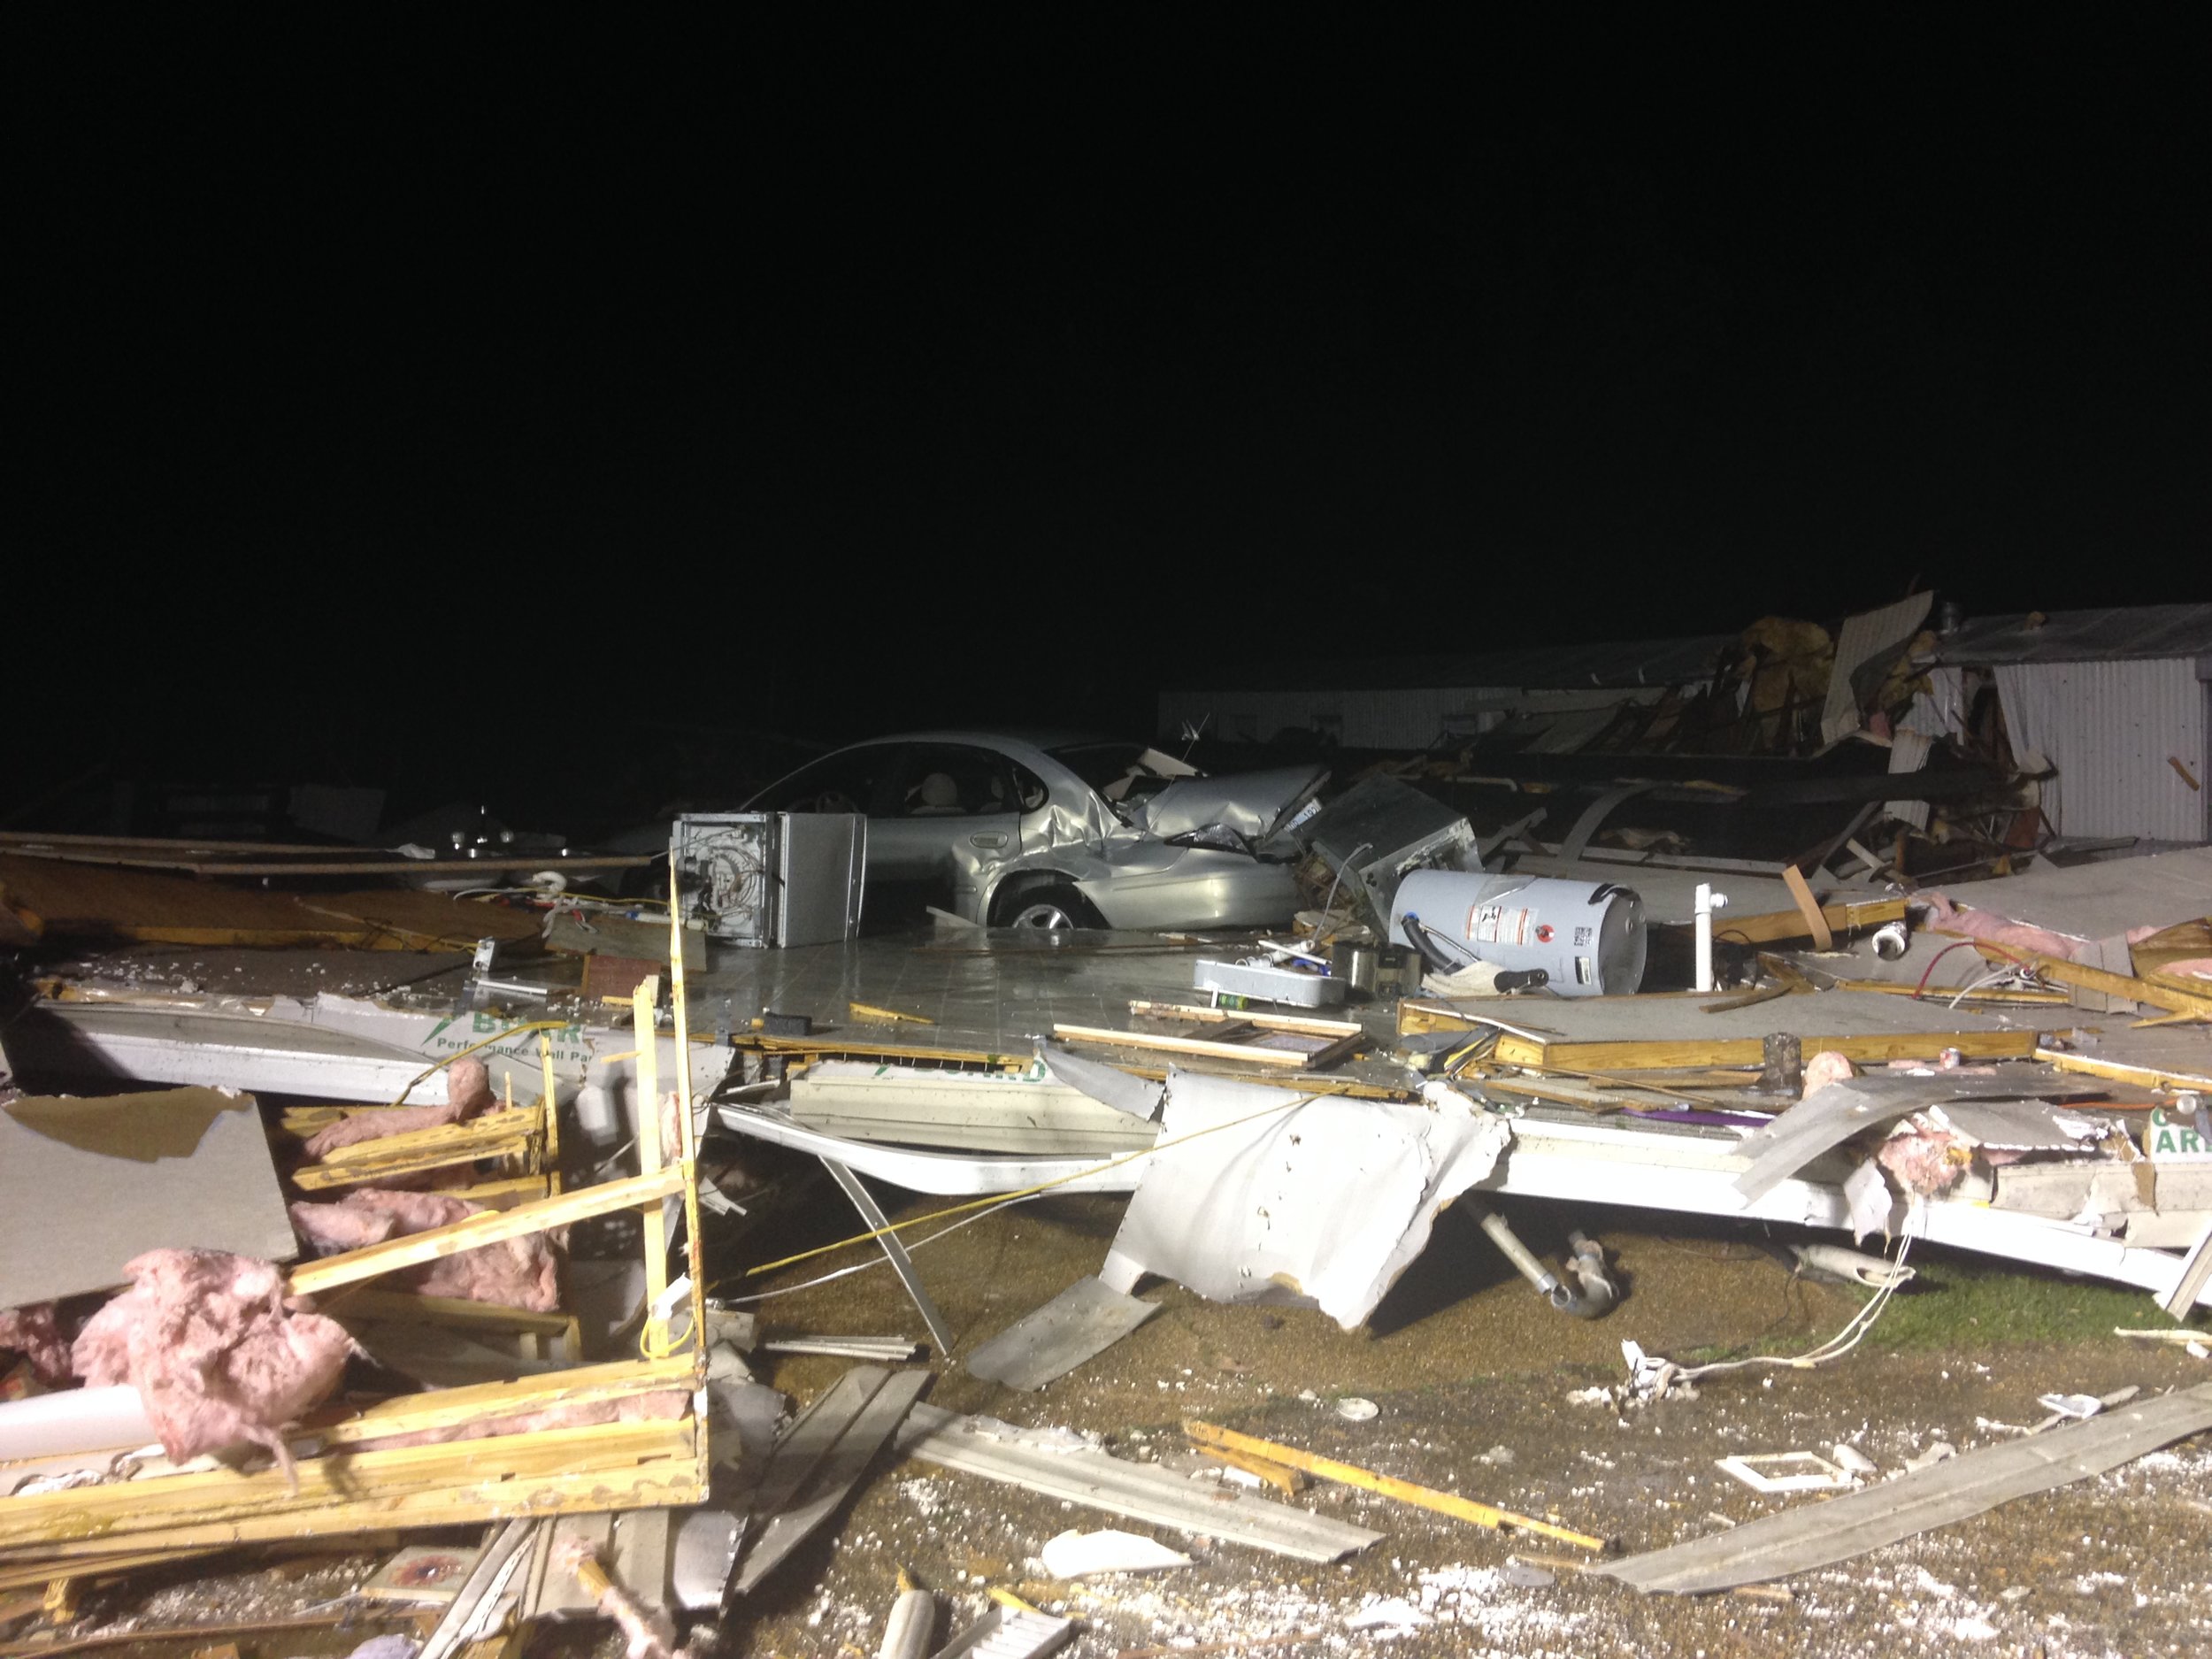 I have had the unfortunate opportunity to work several tornado incidents each with it's own set of obstacles to overcome. I have seen the overwhelming need to be personally prepared for these incidents and for you to not rely on anyone or any agency for assistance. Whether you respond locally or are deployed on a multi-day mission, you need to be prepared. There are many must have items when you are tasked with search and rescue operations during these disasters. Many of which you can prepare ahead of time or when imminent severe weather is approaching.
I put together this video awhile back and thought it might need to be re-posted due to the recent events. Share this information with your fellow rescuers, you can never be to prepared when something like this happens.
I have had the unfortunate opportunity to work several tornado incidents each with it's own set of obstacles to overcome. I have seen the overwhelming need to be personally prepared for these incidents and for you to not rely on anyone or any agency for assistance. Whether you respond locally or are deployed on a multi-day mission, you need to be prepared. There are many must have items when you are tasked with search and rescue operations during these disasters. Many of which you can prepare ahead of time or when imminent severe weather is approaching.
I put together this video awhile back and thought it might need to be re-posted due to the recent events. Share this information with your fellow rescuers, you can never be to prepared when something like this happens.
If you need help building your own response kit, check out the National Association for Search and Rescue's Pack List. You can click here to view and print this document. You can use this list to decide what you believe is relevant to your needs. I can assure you that you will nearly always need: Batteries, Navigation Equipment (GPS, Lensatic Compass), Flashlights, Boots, Gloves, Helmet, Food to snack on and plenty of WATER!
Even if you believe you are going on a USAR mission, one that will have an urban landscape, it will not be easy to navigate. Urban landscapes turn into wilderness landscapes very quickly after a tornado or hurricane. You will loose road signs, landmarks, electricity and even natural features will become hard to identify in the carnage.
Friction Loss for Beginners

 Friction loss is something that is stressed about and is made out to be very difficult for new pump operators. In reality it isn’t. This is how the definition is read: Friction is the force resisting the relative motion of solid surfaces, fluid layers, and material elements sliding against each other (Friction, 2013). Friction Loss is the pressure loss due to the friction. In this case, the friction is water sliding against the interior of the fire hose.
To overcome this, the pump operator must throttle up to ensure that the firefighter, on the nozzle, will have the appropriate amount of water to suppress the fire. Friction loss can be calculated using mathematical equations which is the Theoretical Method. You can also calculate friction loss using a series of easy to use methods that do not require a lot of math, these are called Fire-Ground Methods. For the purpose of this article we will focus on the fire-ground methods. I feel there is not enough emphasis put on fire-ground methods. All too often when a new pump operator is being taught friction loss the instructors jump straight to the equations because they are the hardest to grasp. No offense to the great pump operations instructors out there, but I haven’t seen too many calculators on the fire scene lately. How can a firefighter figure this stuff out on the scene? Theoretical calculations are generally used for pre-planning, spec'ing apparatus and calculating problems ahead of time; for instance making pump charts. You do not use theoretical calculations on fire scenes. There are multiple fire-ground methods for 1-¾ line, but I will talk about the one that works best for me… memorization. Yes, it sounds hard but its not. Its simple… just memorize the friction loss for the gallonage setting(s) on the nozzle. Most 100psi adjustable fog nozzles have four settings 95gpm, 125gpm, 150gpm, and 200gpm. So, all you have to remember is 14, 24, 35, and 62. These are the exact amounts of friction loss per 100 feet based on the gallonage above. There is 14psi friction loss per 100 feet when you are flowing 95 gallons per minute. If you have a 100-foot line your friction loss is 14, if you have a 200-foot line your friction loss is 28. It works the same way for the other gallonage settings. For example, if you are flowing 150gpm on a 100-foot line your friction loss is 35, if you are using a 200-foot line you friction loss is 70. Keep in mind this is just the friction loss; it is not the pressure you pump at the engine. In order to figure this, you have to take into account nozzle pressure.
Friction loss is something that is stressed about and is made out to be very difficult for new pump operators. In reality it isn’t. This is how the definition is read: Friction is the force resisting the relative motion of solid surfaces, fluid layers, and material elements sliding against each other (Friction, 2013). Friction Loss is the pressure loss due to the friction. In this case, the friction is water sliding against the interior of the fire hose.
To overcome this, the pump operator must throttle up to ensure that the firefighter, on the nozzle, will have the appropriate amount of water to suppress the fire. Friction loss can be calculated using mathematical equations which is the Theoretical Method. You can also calculate friction loss using a series of easy to use methods that do not require a lot of math, these are called Fire-Ground Methods. For the purpose of this article we will focus on the fire-ground methods. I feel there is not enough emphasis put on fire-ground methods. All too often when a new pump operator is being taught friction loss the instructors jump straight to the equations because they are the hardest to grasp. No offense to the great pump operations instructors out there, but I haven’t seen too many calculators on the fire scene lately. How can a firefighter figure this stuff out on the scene? Theoretical calculations are generally used for pre-planning, spec'ing apparatus and calculating problems ahead of time; for instance making pump charts. You do not use theoretical calculations on fire scenes. There are multiple fire-ground methods for 1-¾ line, but I will talk about the one that works best for me… memorization. Yes, it sounds hard but its not. Its simple… just memorize the friction loss for the gallonage setting(s) on the nozzle. Most 100psi adjustable fog nozzles have four settings 95gpm, 125gpm, 150gpm, and 200gpm. So, all you have to remember is 14, 24, 35, and 62. These are the exact amounts of friction loss per 100 feet based on the gallonage above. There is 14psi friction loss per 100 feet when you are flowing 95 gallons per minute. If you have a 100-foot line your friction loss is 14, if you have a 200-foot line your friction loss is 28. It works the same way for the other gallonage settings. For example, if you are flowing 150gpm on a 100-foot line your friction loss is 35, if you are using a 200-foot line you friction loss is 70. Keep in mind this is just the friction loss; it is not the pressure you pump at the engine. In order to figure this, you have to take into account nozzle pressure.
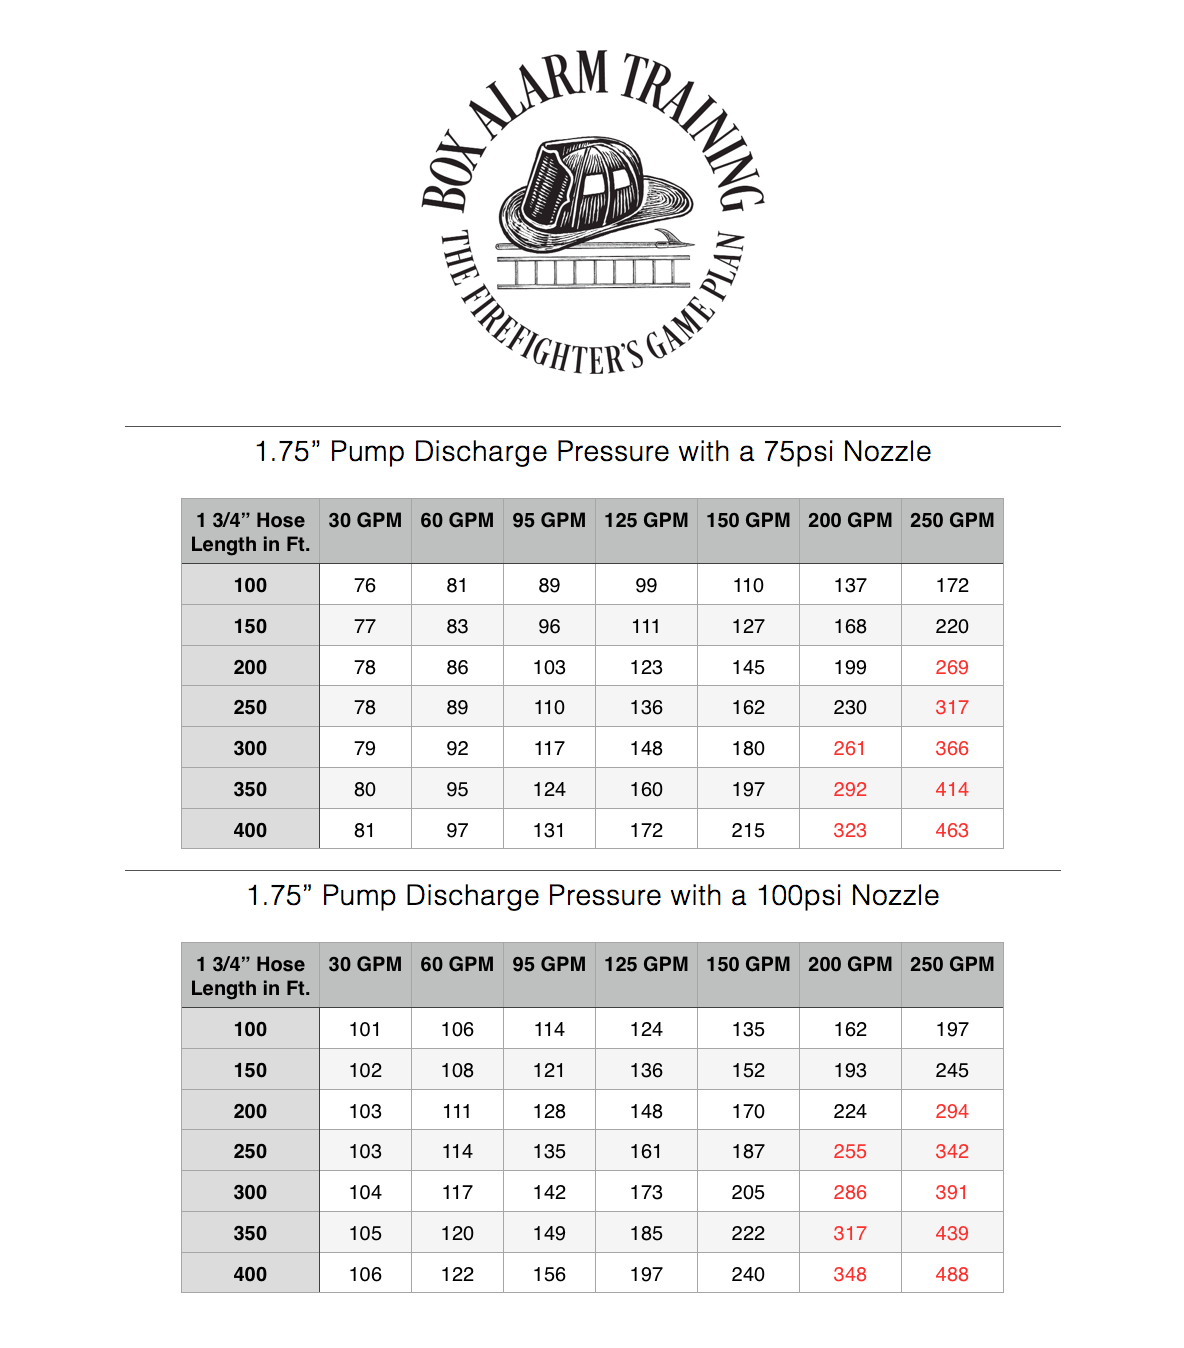 Most fog nozzles require a pressure of 100psi or 75psi for it to function properly, this is called the Nozzle Pressure. So, all you have to do is add 100psi or 75psi (Depending on your nozzle) to whatever your friction loss is and that will be your required Pump Discharge Pressure. So, lets say you are driving one day and you pull up on a car fire that only requires a 100-foot line. Your department’s SOPs require you to flow 95gpm while fighting this fire. This means you have to figure the friction loss, which is 14, and then add it to the nozzle pressure, which is 100.
14 (Friction Loss)+ 100 (Nozzle Pressure) =114psi (Pump Discharge Pressure)
So, 114psi would be your pump discharge pressure. It works the same way with the 200gpm setting. If you are at a structure fire and you need to flow 200gpm out of a 200-foot line; first, figure the friction loss, which is 62 per 100. 62 for the first hundred plus 62 for the second hundred equals 124. After this is figured all you need to do is add the nozzle pressure, in this case it is 100.
124 (Friction Loss) + 100 (Nozzle Pressure) = 224psi (Pump Discharge Pressure)
So, 224psi is your required pump discharge pressure. This method works the same way on low-pressure fog nozzles. They usually have a nozzle pressure of 75psi. So, instead of adding 100psi just add 75psi. In no way, shape, or form do I claim to be a great pump operator or even a good one for that matter. I have just figured out what works for me and I can do it efficiently. You may want to try the hand method… It requires too much on scene math for me. However, in my next article I will explain it. Until then just click on this: The Pump Discharge Pressure Chart. You can make your own pump charts for your engine which will tell the pump operator what to pump for each line on your engine. You just find the gallonage and the length of hose you have, then the chart tells you what pressure to pump the truck.
You can also download a printable PDF version of this article by clicking here.
To read about our contributors including Wes Anderson click here.
Friction. In (2013). Wikipedia. Wikimedia. Retrieved from http://en.wikipedia.org/wiki/Friction